Where have I been? Either outside gardening and getting our yard in order, or inside playing with my newest favorite product from Martha Stewart Crafts: Glass Etching Cream. I showed you how to make your own etched beer glasses last week. It’s a great Father’s Day gift idea – very easy to do with excellent results in a short amount of time. We like those kinds of crafts!
I’ve been having so much fun trying out this cream on different glass pieces that I have, and over the weekend I got an idea that I wanted to try out. It worked! And it turned out exactly as I had envisioned, which is always “a good thing” as Martha would say!
Presenting . . . (can you feel the anticipation?)
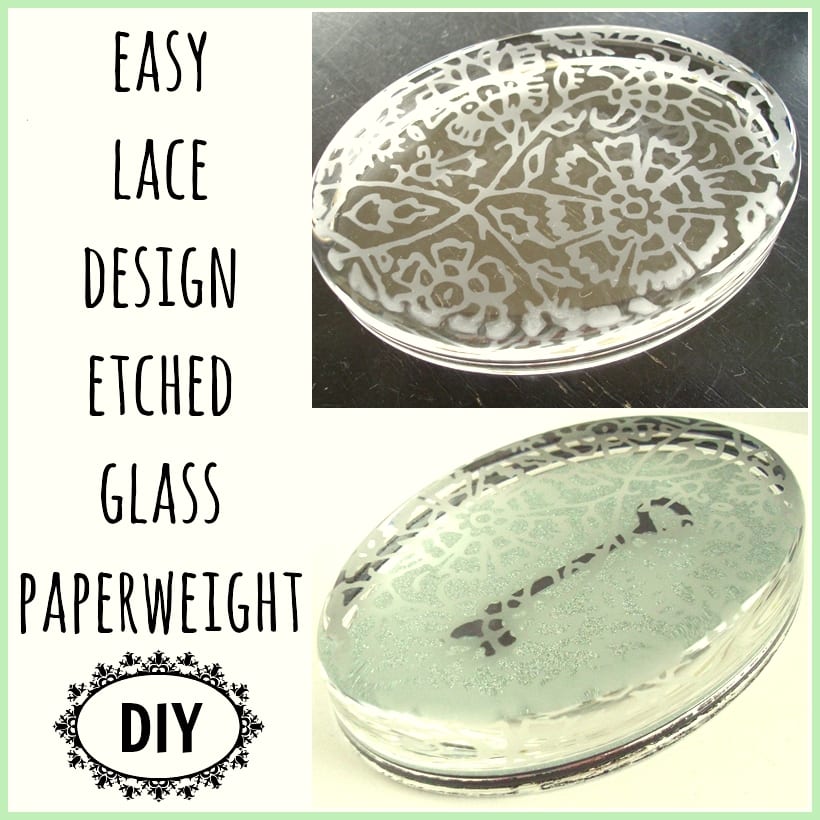
How to make a lace design on glass using the Martha Stewart glass etching cream.
I tried this out on a basic glass paperweight found at a craft store years ago. (Yes, this lovely thing has been sitting hidden under lots of other loot in my craft room. Let’s hear it for Spring cleaning and the goodies you can uncover!)
For complete start-to-finish instructions on how to use this cream, please see my tutorial on DIY Etched Beer Glasses here.
I cover all the specifics, including
- prep work needed
- complete supplies list
- step-by-step instructions
- action shots
Yes indeed, there are action shots! Glass etching happening before your eyes! So click over for the details. Then pop back over here and check this idea out!
Basic supplies: (refer here for complete list)
- Martha Stewart Glass Etching Cream
- Martha Stewart Crafts Foam Pouncers
- Martha Stewart Floral Paisley Adhesive Silkscreens
- Rubber gloves
- Blue painters tape
- Glass paperweight
- Optional: decorative paper, fabric and/or embellishments to finish off your piece

Next, I carefully removed the large paisley silkscreen from its packaging and backing, and played with the placement on the paperweight until I was happy with how I hoped and prayed the “lace” would look. The silkscreen is adhesive-backed, which made placement easy. Apply a thick layer of the glass etching cream with the foam pouncer. Because there are tiny netting holes (best way I can describe it for you) in the silkscreen pattern where normally the glass paint would go, I pounced the cream down a bit heavier than I’d normally do for stenciling, just to give you an idea of technique.
Once the cream was globbed on, I chose to wait 25 minutes instead of the normal 15 minutes, because I had no idea how this was going to turn out thought it might need the extra time to do its etching magic! You can see below how the large paisley stencil covered the paperweight, and then some, making it easy to use for my lace pattern idea.

And it worked!

It totally worked just the way I had imagined! Whoo hoo!

You could really show off the lace pattern by applying some black velvet or velour to the inside of your paperweight. And I will probably do that on some future ones – but the idea I already had in mind was to cover the paperweight in the glass-etched lace, and then put a solid sparkly paper underneath along with one antique-style key.
I have a bunch of small diecuts accumulated over the years – you know how it is – and a found a great vintage-style key. However, the coloring on it was more of a muted gray. I wanted black, so I grabbed my trusty StazOn ink pad and stamped it all over the key to get it exactly the way I wanted.

Next I made the key into a sticker simply by using my Xyron 150 Create-a-Sticker tool (named for the 1.5″ width opening). Simply put your item in the opening on the upper right side, pull the adhesive strip out slowly on the lower left side, and tear off.

After rubbing the sticker paper covering the top and bottom of the diecut with my bone folder (to make sure all the adhesive transferred to the key), I removed the key from the sticker paper and placed it in the center of my oval cardstock shape I had previously cut out.
The paper I used is a gorgeous mint-colored glitter cardstock from American Crafts, which I first played with when making my Springtime Large Paper Medallion. I adore this cardstock and definitely want to get some other colors! I used a piece of adhesive-backed black felt that came with the paperweight for the base.

I’m smiling big-time as I type this, because I love the way this paperweight turned out and still can’t get over that it looks exactly as I had hoped and prayed that it would! 🙂


~Laura
PS – This is not a sponsored post. Just me experimenting with my new favorite product! 😉
Sooooooo awesome! I have been itching to etch something else. LOVE this! Pinning.
I know, right? The possibilities are truly endless! Thanks Carol! 🙂
Nice! I love how you added the key too.
Thanks so much Anne! I had “keys” on the brain. I love the vintage key motif that shows up on a lot of vintage accessories, both handmade and manufactured, yet I had never created something of my own. Now I have! 🙂
This is so pretty Laura! I love etching glass. People think it’s difficult but it’s sooooo easy! Pinned it!
Thanks for pinning Kim! And you’re right: it IS so easy, and I hope everyone tries it for themselves! 🙂
I have never tried etching before, I am definitely open to it after seeing your project!
becoming a new bloglovin’ follower!
oops, and friend connect follower.
Thanks so much Krystie! Trust me: you will love how amazing the results are – and – how quickly you can etch something! 🙂 Let me know if you try it, I’d love to see pics!
How cool! Hoping this is one of those projects I pin and actually do!lol
LOL I hear you Erin! Instead of the “Maybe someday I’ll get around to thinking about possibly considering or attempting this project…,” this is one that anyone can do! 🙂 Thanks for pinning!
Laura, love the etching. That really is a cool product too! Thanks for sharing.
You’re welcome, Deneen! Give it a try! (In between creating your gorgeous painted furniture pieces, that is!)
Gorgeous! I love the lace pattern and the way that you used it on the paperweight. The key looks so great — I thought it was real.
Jenn
Thanks Jenn! About that cardboard diecut key: everyone I’ve showed this paperweight to – in person – has said the same thing! 🙂
Wow Laura that is really cool!
Thanks Malia! I wish I could have better photographed how the glitter paper sparkles “underneath” the glass etching when the light hits it just right. But then again… I wish for a lot of things! 😉
What a beautiful paperweight!! Love the key and the etching!
Thank you Niki! Definitely going to repeat this one for gifts, because you know everyone still suffers from paper clutter: they NEED a paperweight, right? 🙂
I love this! I’ve always wondered how it was done. I’d love it if you could link this up to our party, Give Me The Goods Monday! {1 party, 4 blogs}
Have a great week!
Jamie @ somuchbetterwithage.com
Hi Jamie – thanks for letting me know about your link party, as it also introduced me to your blog and the other gals’ blogs! 🙂 I’ll definitely stop by on Monday and link my paperweight up!
That looks great! I always love the look of etched glass but its never has noticeable as I would like it to be when I do it. I’ll have to try leaving it on longer next time.
Hi Sheena – try an easy trick for those etched glass pieces you’ve already done: If you feel the etching doesn’t show up as much as you’d like, just put something very dark-colored behind it. Navy, black, maroon, dark green really show off the whiteness of etching. 🙂
Laura this turned out wonderful! What a great idea! 😉 Bonnie
Thanks Bonnie! So glad you stopped by!
This is great! I love the key and the depth it gives. I have been wanting to etch something for ages…. maybe I’ll finally give it a try. Totally pinning this.:)
Thanks Kadie, for pointing out how the key provides depth: I honestly hadn’t thought about it, but you’re right and I love it! Thanks for pinning, and let me know if you do this! You. will. love. it.
Hi Laura – I wanted to let you know that a blogger, About Petroleum Jelly, is stealing your blog posts and posting them as his or her own. They are doing this to a friend of mine, so I have been keeping an eye out… Your copycat post can be found here:
Nicole
Thanks so much Nicole for letting me know! I’m on it!
Nicole – Just wanted to say another HUGE thanks to you for letting me know! So far, I’ve found at least 7 of my posts on the site you shared. Looks like they’ve been using my stuff for quite some time. I filled out a copyright infringement form that Blogger has, and already got an email back that Google is looking into it. I hope your friend filled out the same form. 🙂
Laura,
Thanks for the tutorial! I just got a door with glass panes and was wanting to etch them. I will have to try the Martha Stewart Etching Cream. So cool!
I hope you get your copycat taken care of. That really sucks!
You’re welcome Cecilia! Let me know if you etch the glass panes – I’d love to see pics and share here with my readers! And yes – the copycat is slowly being taken down…one post at a time! 🙂
How pretty! I’m always looking for gift ideas like this! Thanks!
Have a fabulous weekend!
~Kim
Thanks Kim – I’m glad you enjoyed it! I think there’s several people on my holiday gift list who will be getting some version of these paperweights! 🙂
Where do you find your glass paperweights? I’m not having any luck with the craft stores and so want to make one of these!!
I haven’t looked around recently for glass paperweights. As I mentioned in my post above, I found this one years ago at a craft store and it had been gathering dust on my craft shelf. 🙂 Perhaps a Google search will help you!
Fantastic ideas.
Thanks Christine!