• Skip to primary navigation
  • Skip to main content
  • Skip to primary sidebar
  • Home
  • Gardening Index
  • Videos
  • Subscribe
  • Navigation Menu: Social Icons

    • Facebook
    • Instagram
    • Pinterest
    • RSS
    • Twitter
    • YouTube
Garden Sanity by Pet Scribbles

DIY Etched Beer Glasses

This post and photos may contain Amazon or other affiliate links. If you purchase something through any link, I may receive a small commission at no extra charge to you. Any supplies used may be given to me free of charge, however, all projects and opinions are my own.


May 7, 2013 By Laura

Pin
Share
Post
11Shares

DIY Etched Beer Glasses - a great gift for Father's Day, for groomsmen, for homebrewers!
My husband is a homebrewer, as in brews his own beer. I’m not talking anything basic here, but rather a burgeoning craft brewery developing in our basement what with all the fancy equipment and gadgets needed to produce quality craft beers. (He’s even attending a national homebrewers conference in Philly this Summer to learn from the experts. We’re talking serious homebrewer!) So, making some etched beer glasses is a perfect Father’s Day gift. No, we don’t have kids. We do have cats. And so our cats will be giving these glasses to him on Father’s Day!
I received an amazing array of supplies from Martha Stewart Crafts, and the moment I saw the Glass Etching Cream, I knew what I wanted to make for my husband: Etched Beer Glasses!
 
Supplies needed:
  • Beer Glasses (I used Pilsner-style glasses, which are easily found at many stores)
  • Martha Stewart Crafts Glass Etching Cream (with included brush)
  • Martha Stewart Crafts Glass Adhesive Stencils – Classic Serif Alphabet
  • Painter’s Tape
  • Rubbing Alcohol
  • Rubber Gloves
  • Access to nearby sink
  • Timer or clock
Martha Stewart Crafts Adhesive Stencils and Glass Etching Cream

Let’s begin by putting on your rubber gloves!


Step One: Preparation of the Glass

Wash your glasses with dish soap and water, dry thoroughly, and then apply rubbing alcohol all over to make sure there are no remaining oils on the glass. 
Don’t keep the rubbing alcohol bottle open too long, as it will A) begin to evaporate into your breathing space, and B) begin to stink!

Step Two: Placement of Stencils

This may take some time, depending on what you want your stencil design to be. Monograms are a great choice, as you can use a large letter for the center, and two of the smaller letters (in the same package) for each side. Words are an easy choice, of course. And the Martha Stewart Crafts Classic Serif Alphabet Stencils include numbers plus a few graphic elements as well, if you want to make a design with or without letters.
Martha Stewart Crafts Adhesive Stencils - Classic Serif Alphabet


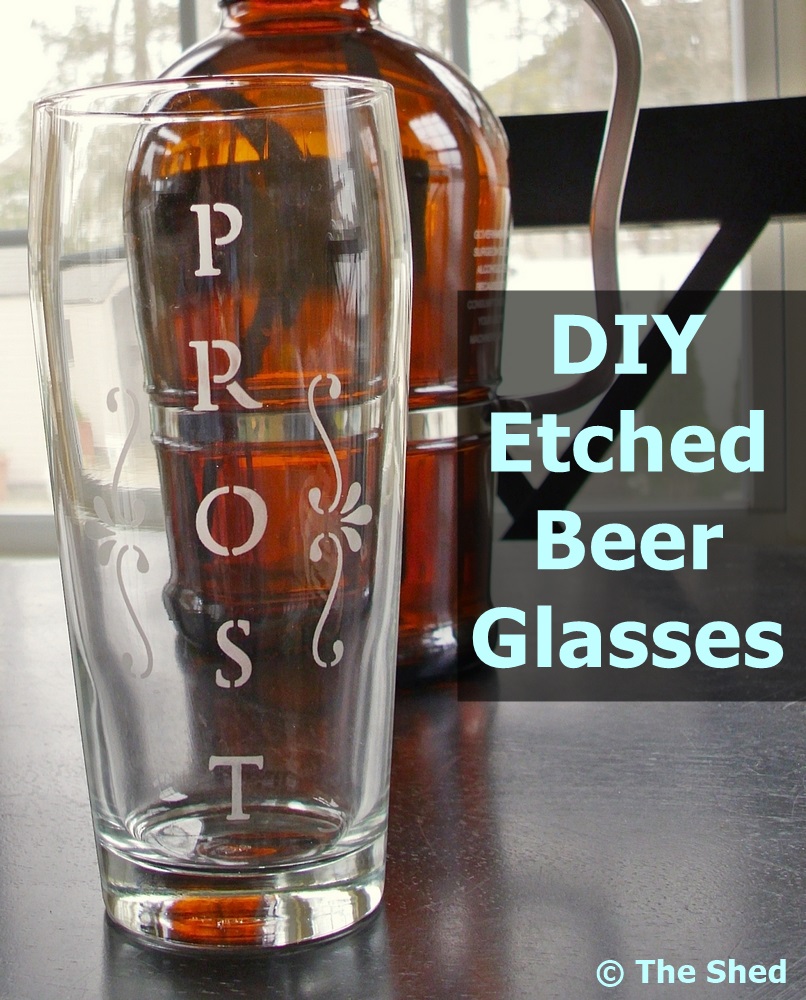
I chose the German word Prost, which translates to Cheers in English. Husband’s family from Germany, a word we’ve used many times here and over there, seemed like a natural choice!

Applying the Martha Stewart Adhesive Stencils

After playing with the placement, I decided to place the letters vertically for easier reading. Once I was happy that their placement was as perfect as I was going to get it, I felt like it needed something more. I added one of the graphic elements, with the intention of reusing the stencil to add one to the other side of the letters as a mirror image.

 
Tip: As these stencils themselves don’t have guides or lines to match up on them, you do need to play with your placement a bit. I used a straight edge for placing the letters, but still needed to adjust. For the graphic swirl elements I used a tape measure to make sure the placement was spaced correctly.
Step Three: Mask Area Around Stencils
 
As an extra measure of protection, I ripped up thin strips of my painter’s tape to mask the area around each stencil, to avoid getting any etching cream where I didn’t want it. (Trust me: this is a good step to do, as I found out when I first played with the etching cream on some recycled glass jars!)

Masking the area around the stencils with painter's tape


The first three steps take the most time. And you should take your time with each step, because the better your preparation, placement, and masking, the better your etched piece of glass will turn out.

Step Four: Apply the Etching Cream
 
Here’s the fun part: the glass etching actually took the least amount of time for me! Because once you apply the etching cream, you simply have to wait 15 minutes! Apply the cream in a thick layer evenly over the stencils, while being careful not to get too close to the edges of your stencils and/or taped areas. 
Applying the Martha Stewart Glass Etching Cream
Using the Martha Stewart Glass Etching Cream


Time to check Instagram, Pinterest, or sit and stare at the etching cream and wonder if this easy process is actually going to work. (I did all three!)


After 15 minutes, rinse the etching cream off very well, then remove the tape and stencils. I washed off the stencils with hand soap and set them to dry. And then admired my handywork! Yes, this easy process worked! And looked fantastic! But I wasn’t quite done yet.

Design element included in Martha Stewart Alphabet Stencils
I washed the glass where I wanted to apply the “mirror image” of the graphic swirly stencil, dried thoroughly, then applied rubbing alcohol and let dry. (Make sure you are careful not to get the rubbing alcohol on your just-stenciled letters. I know you will be careful, but just in case…) 

I applied the stencil, measured it with my cloth measuring tape, added the painter’s tape around it – avoiding the just-stenciled letters – and repeated the process of applying the etching cream. Another 15 minutes, and I had a completed glass!

Easy Etched Beer Glasses - a great gift for Father's Day!


DIY Etched Beer Glasses - a great gift for guys!


These etched beer glasses are easy to make, and are a perfect gift for Father’s Day.


Easy Etched Beer Glasses - a great gift for homebrewers!


Martha Stewart Glass Etching - design detail up close


This is also a popular gift for Grooms to give to their wedding party, so for all of you brides-to-be out there – not like you don’t already have enough to do – suggest this idea to your future husband and perhaps he can get crafty too. 
Yes, your husband-to-be will probably end up asking you to do this project for him help with this project, but trust me this is easy not only in technique but also in terms of the time needed: not that much!

DIY Etched Beer Glasses - a great gift for groomsmen!


Prost!


I plan on etching three additional pilsner glasses to make a nice set!


~Laura


Disclosure: I wrote this post as part of a sponsored campaign with Plaid Crafts and The Blueprint Social. All opinions are most definitely my own!

Pin
Share
Post
11Shares

Filed Under: Crafts & DIY, Summer Crafts Tagged With: Etched Beer Glasses, Father's Day, Gifts for Men, Martha Stewart Crafts, Martha Stewart Glass Etching Cream, Martha Stewart Stencils, Plaid Crafts

Previous Post: « Spring Flowers Close Up: Purple Crocuses, Narcissus, and Star Magnolia
Next Post: How To Etch Glass: Lace Design on Glass Paperweight »

Reader Interactions

Comments

  1. Carol TheAnswerIsChocolate

    May 7, 2013 at 7:59 pm

    Let’s hear it for the boys! So glad you did a guy project and it’s perfect! Beer looks pretty good too πŸ™‚

    • Laura / The Shed by Pet Scribbles

      May 7, 2013 at 8:06 pm

      Thanks Carol! And I’ll pass along your compliment on the beer to Hans! πŸ™‚

  2. Vivienne @ the V Spot

    May 8, 2013 at 12:57 am

    Love !!!

    • Laura / The Shed by Pet Scribbles

      May 8, 2013 at 2:03 am

      Thanks Viv! πŸ™‚

  3. Carissa Bonham

    May 8, 2013 at 5:19 am

    great project. looks awesome! These could be totally fun as a set with “cheers” in several different languages – then people could tell which glass was theirs.

    • Laura / The Shed by Pet Scribbles

      May 8, 2013 at 1:50 pm

      Thanks Carissa! That’s a great idea! I could see a set of 8 or 12 of these as a wonderful wedding gift! πŸ™‚

  4. Katie

    May 8, 2013 at 11:12 am

    Love your etched beer glass! Love this gift idea for father’s day!

    • Laura / The Shed by Pet Scribbles

      May 8, 2013 at 1:51 pm

      Thanks so much Katie! I love how easy it was to do, with such professional-looking results!

  5. malia

    May 10, 2013 at 1:40 pm

    Hey Laura! I love how they turned out. Looks like the perfect Dad’s Day gift. I have never tried MS glass etching products but it looks like you get a great crisp result from the stencils. Have a great weekend my friend! xo

    • Laura / The Shed by Pet Scribbles

      May 12, 2013 at 2:40 pm

      Hope you’re having a fab weekend too, Malia! You simply MUST try the Martha Stewart Glass Etching cream! Not only am I glass etching all over the place, but even my husband has come up with some ideas too! Not just his beer glasses! πŸ˜‰

  6. Jenn

    May 23, 2013 at 3:55 pm

    Hi Laura! Found you through Pinterest. Love this idea and I will be heading out to Michael’s/Joann’s soon to get the glass etching kit and some glasses.

    BTW…my husband is also a home brewer. Where did you get the awesome growler in the back with the metal handles? Thank you for the wonderful tutorial! -Jenn πŸ™‚

    • Laura / The Shed by Pet Scribbles

      May 26, 2013 at 2:48 pm

      Oooh, you must make these glasses for your husband! πŸ™‚ We purchased this growler – which I agree is awesome – during a visit to Fredericksburg, Texas a few years ago. We stopped at the Fredericksburg Brewery and they had these for sale! Here’s their website: http://www.yourbrewery.com/

  7. Jennifer @ Town and Country Living

    June 5, 2013 at 11:49 pm

    Love this!! Sharing it on my FB page tonight.

    • Laura / The Shed by Pet Scribbles

      June 6, 2013 at 10:50 pm

      Thanks so much for sharing this with your readers, Jennifer! πŸ™‚

  8. aravis

    June 8, 2013 at 3:17 pm

    It’s amazing as I just etched a beer glass for my husband. His is an old one and not as shiny as yours.
    Would love for you to give a feedback

    • Laura / The Shed by Pet Scribbles

      June 15, 2013 at 12:35 pm

      You did a nice job, and I love the idea of using a that wheat or hops graphic in place of the E! Very creative!

  9. Jillian

    November 19, 2013 at 9:29 pm

    Hey I was wondering how it washed? Do you have to hand wash them or can you wash in the dishwasher? Thanks!!

    • Laura / The Shed by Pet Scribbles

      November 19, 2013 at 11:31 pm

      Thanks for asking Jillian! The manufacturer states that etched items (using this cream) can be safely washed on the top rack of a dishwasher. Personally, we handwash the beer glasses, just because that’s what we do with all of our beer and wine glasses whether they are etched or not. Hope this helps!

Primary Sidebar


Welcome to Garden Sanity by Pet Scribbles. I’m Laura, an artist and self-taught gardener. Gardening is therapeutic for me, peaceful and calming. I write articles and film videos centered around my own gardens, with plenty of plant suggestions and gardening tips. I’m glad you’re here and happy to share my garden inspiration with you!

As an Amazon Associate I earn from qualifying purchases.

As an Amazon Associate I earn from qualifying purchases.

© 2025 β€’ PET SCRIBBLES LLC β€’ PRIVACY POLICY