
This tutorial will show you how easy it is to turn wood into metal.
OK. That’s not possible! But it is possible to make a wooden object look like beautifully aged metal with an easy faux copper patina paint finish.
I’ve shared faux paint finish techniques here before, and I’m super excited about sharing this one with you!
The Paints
This post is part of a campaign with Modern Masters and LooksiSquare. I was provided with materials for my projects, but as always my opinions are 100% my own.
This was my first time using the Metal Effects line by Modern Masters paints, but it definitely won’t be my last. These paints make for fun projects with very satisfying results!
Modern Masters paints are water based. Yes, water based! This means no icky fumes and no difficulty when cleaning up, as the paint can be washed out of your brushes with soap and water. Easy peasy!
The Project
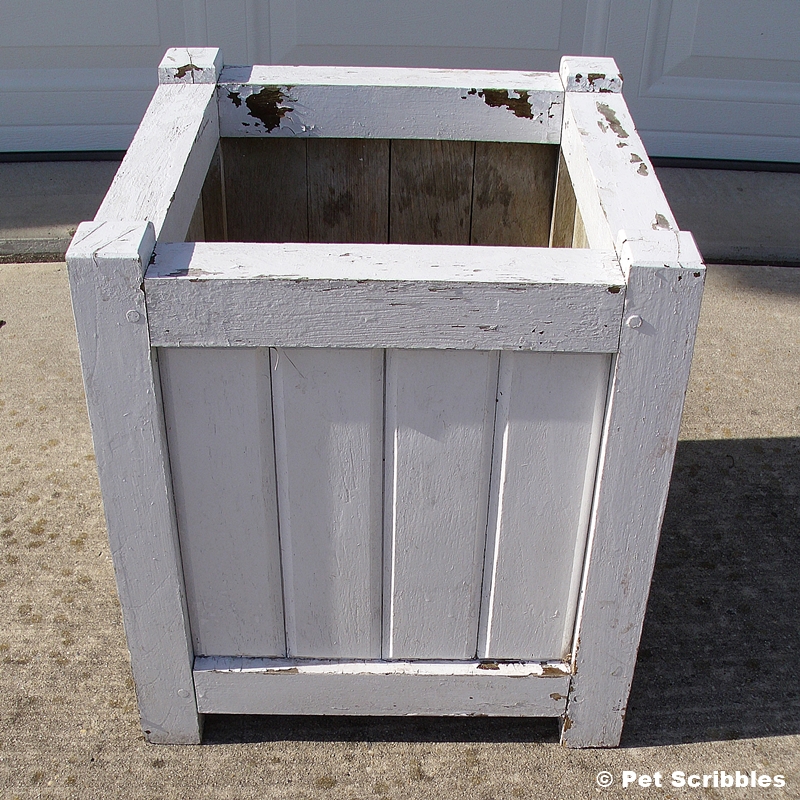
We’ve had a set of chipped and flaking old wooden planter boxes for a few years now, just waiting for me to make them over.
Him: Do we really need these?
Me: Yes, I’ll make them over and they’ll look awesome. I promise.
Him: And how exactly are you going to make them over?
Me: No clue, but I promise you they won’t just sit there gathering dust in the backyard.
That conversation took place about three years ago. Yes, the planters gathered much dust!
The Work Area
You want a large area to work in, so you’re not cramped when moving around and painting. I use our basement to paint my large projects like furniture, but you could also do this in your garage or outdoors. (The fact that we have sub-zero temperatures in our area means painting outdoors is not currently an option!)
Supplies
Supplies needed for prep work:
- Hand sander
- White rags
Supplies needed for painting:
- Modern Masters Metal Effects Primer
- Modern Masters Copper Reactive Metallic Paint
- Modern Masters Green Patina Aging Solution
- Rubber Gloves
- Paint Brushes
- Water Jar
Tutorial
Step One: Prep your surface.
Since these planters were old, and had lots of chipping paint, they needed a thorough sanding before any painting could be done.
It’s not a fun step.
It’s definitely a messy step. (I marched my clothing straight to the laundry room after I was finished.)
However, it’s a necessary step when you’re starting with any piece that has paint chips flaking off, as you don’t want any pieces coming off when you’re applying the paint. I used my small electric hand sander to make quick work of this step, then wiped down all the surfaces with white rags to remove all of the dust.
Step Two: Apply two coats of Modern Masters Metal Effects Primer.
The Metal Effects Primer is made specifically for use with the Modern Masters line of reactive metal paints and solutions.

Specifically, this primer provides a protective barrier on the surface you’re painting, so it blocks any of the special activator solutions – for either rusting or achieving patina effects – from reaching the actual surface where they could start eating away at your actual project. Oxidation is a fascinating thing, but since you want your project to stand the test of time, use this primer first!

The second coat of primer can be applied 30 minutes after the first coat. This is a nice feature! Once I finished applying the first coat to the second planter, I was able to begin applying the second coat to the first planter. Did you follow that?
I left the planters to sit overnight.
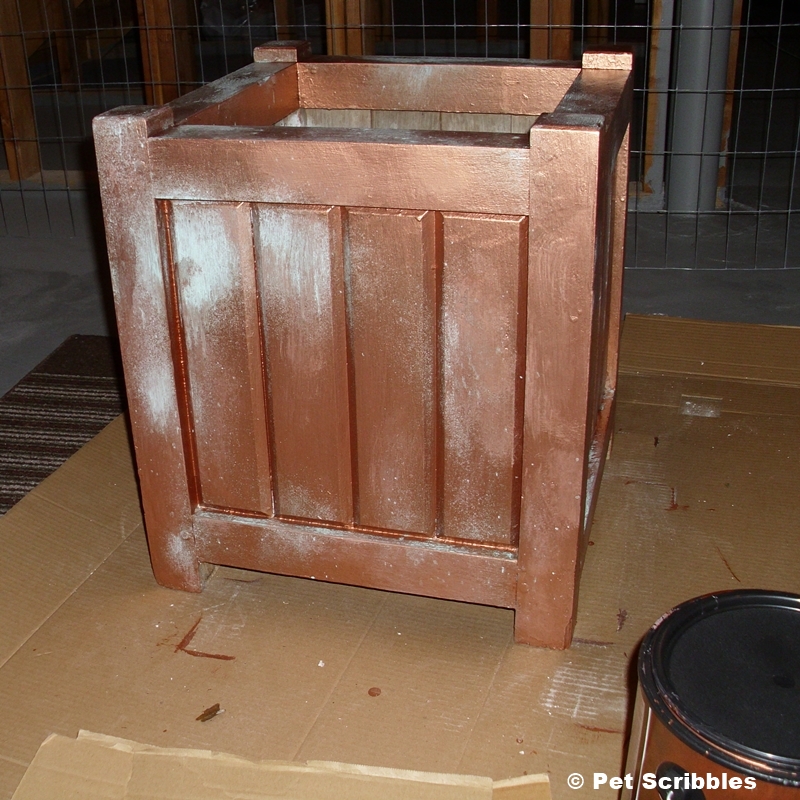
Step Three: Apply one coat of the Modern Masters Copper Reactive Metallic Paint.
Th Modern Masters Reactive Metallic Paints are SO cool! They have actual metal particles in them, which will oxidize naturally over time when exposed to the elements!

Think of those fantastic weathered urns and garden objects you’ve admired in catalogs, in stores…or when touring old gardens here or in Europe. (If you want a solid copper finish that won’t tarnish, use their regular metallic paints.)
Let dry for several hours. Again, I left mine to sit overnight.
You could leave your project as is, after applying this paint – although I’d suggest at least two coats – if you want your piece to slowly achieve a patina finish. But who wants to wait that long? Not me! But if you were patient, you could apply two coats of the Reactive Metallic Paint and stop here.

Step Four: Apply a second coat of the Modern Masters Copper Reactive Metallic Paint, working in small sections at a time, and while the paint is still wet, spray on the Modern Masters Green Patina Aging Solution.
This is the most involved step, but also the most fun!
First, what exactly is the Patina Aging Solution?
It’s an acidic solution (also water-based) that reacts with the metal particles in the Reactive Metallic Paints, thus speeding up the oxidation process. Modern Masters offers their patina solutions in both Green and Blue. You can apply this solution with a brush, a sea sponge, or with a spritzer/sprayer cap that conveniently attaches to their bottles – which is what I used.

You want to work in small sections at a time because the Patina Aging Solution must be applied within about 5 minutes of applying the Reactive Metallic Paint.
Once you paint and then spray one section, move onto the next section and repeat the process until you’ve covered your entire piece.
By the time you finish the last section, you’ll see the paint already beginning to oxidize! Science at work! (And I would have definitely been more attentive in science classes growing up if we were doing cool projects like this!)
Step Five: Touch up your work. – or – Admire your work!
After a few hours, I went back down to the basement to check out the planters. They looked good, and the paint was dry to the touch, but I knew it was still oxidizing. Since the look I was going for was a mix of shiny copper in some areas with green patina in others, I applied more copper paint here and there until I was satisfied with the look.
Again, I let the planters sit overnight and do their thing, and the next morning was pleased as punch to see my new aging wood metal planters! Seriously – how cool are they now? Very!

Of course, you can’t see the feet in the snow we got this week, but trust me: you’ll be seeing these planters in future garden posts!
A couple of close-up detail shots . . .


I just love how fast these planter boxes were transformed into a pretty patina finish! And just think: these planters will keep on aging over time. Love!


Making over these planters was the perfect project for our backyard gardens, and I can’t wait to see how they look in the Spring when I’m ready to fill them with flowers. This project also satisfied my gardening obsession, which isn’t easy to do during the Winter months.
More Inspiration!
We’ve been slowly redoing our Library in our home. We’ve had a used lamp in there that I’ve been wanting to redo, and can I just say how awesome the Metallic Effects system worked on the lamp base? There. I said it!


Such a cool result! You can see how it turned out here: Copper Patina Lamp Makeover
June 2014 Update
June 14, 2014 update: I’ve written a post on how this paint has held up after spending months in the Winter outdoor elements. (Hint: it’s lookin’ great!) You can click here to read and see more pics.

Happy crafting!
What a awesome transformation!
Thanks Virginia! I loved seeing the before and after too!
Laura, These turned out fantastic! I love them and I cant wait to see your lamp too! I am loving the Modern Masters paint!
Thank you DeDe! Can’t wait to see your project next week!
Wow Laura that is super cool! I love copper anything… we have a copper clock from Target I picked up probably 15 years ago and it’s still hanging in our kitchen. Good to know I can turn to Modern Masters for more copper paint!
Thanks Malia! I love copper too, much more than gold or silver! You’ll LOVE their copper paint!
Laura…we think alike! Your planters came out beautiful! I haven’t tried the copper before but I will. You did a very informative tutorial too! Debbie
Thanks Debbie! And I absolutely LOVE the urn you rusted! It’s perfect!
Love the planters, Laura! I’m a sucker for anything that’s metallic!
Thank you Tara! I’ve always leaned toward stone planters, but now I’m super-in-love with metallic planters since this project!
Love the copper Laura!! I also love the way you think — I totally eyeball my stash of winter pots everytime winter starts to get to me…dreaming of painting and planting them!!
Thanks Amy! And yes, it’s either daydreaming about what to plant, or daydreaming WHERE to plant! Either one…my husband ends up hearing my plans probably more than he wants to! LOL
I love the look of copper! It is so in right now. And your planters turned out great!
Thanks Megan! I’m so happy that copper is trendy again…although I swear I’ll keep loving it even when everyone else gets tired of it! 😉
Wow! So neat…I love the look of copper and love the fact this paint is water-based!
Yes Lisa – this paint being water-based makes a HUGE difference, especially with the cleanup: it washed off of my brushes so easily!
That paint is so fun…I’ve never used metallic paint like that before!
The paint is SO cool Meredith, I bet you’d create something fabulous with it! 🙂
I love those!!! I adore the look of copper patina! I have a few planters that this would be awesome on! Thanks for sharing!
Thanks Cheryl! I can’t wait to try this paint on my smaller pots and containers, as I’m imagining them all over our gardens, tucked here and there…slowly aging! Well, first they’d age quickly, but then continue slowly over time! 🙂
What a great transformation … I love the copper look!
Thanks Randi! Another copper lover — hooray for us! 🙂
Wow, Laura! Gorgeous!
Awwww, thank you Steph!!
wow what an amazing transformation and look at all that snow!!!
Thank you Katie! As for snow: we rarely get this much here at the Jersey shore, but after loving it in New England…and then missing it since…I’m over-the-moon happy about it! (I know not everyone will agree with me…)
Laura, WOW that is amazing how much they actually look like copper pots. Great job!!! Have a great day, Lisa
Thanks Lisa! So happy to hear they look “real” to you too! Very nice to hear! 🙂
I love the transformation! The copper looks great!
Thanks so much Leanne! 🙂
Very cute! I’m loving the patina spray you used!
The spray nozzle (that easily attaches to the solution bottles) makes it effortless! 🙂 You’ll have to try it, Kadie! (And I’m LOVING your colander light fixture – it looks like an heirloom!)
Oh My GOSH! What a fun Paint…love how it turned out! You Go girl!
Oh I’ll keep going, Jen! LOL Thank you!
This paint looks so awesome!
It IS awesome, Melanie! You would LOVE it! 🙂
Wow – what a gorgeous color and I love the aged patina effect! Your planters are beautiful!
Thanks Heather! I love that I can keep the planters outside, and any further aging or distress will just make them look better and better! So I say to the elements: bring it on! 🙂
These turned out so cool Laura! The color is great!
Thanks ladies! So glad you love the color…and it’s only going to get better! 🙂