This dryer sheet flowers tutorial shows how to create shabby flowers from used dryer sheets. The flowers look like tulle or very sheer fabric! So pretty!
Making dryer sheet flowers is so much fun, because each one turns out slightly unique from the next. This tutorial shows how to tea stain the dryer sheets as well as use spray ink dyes. The end result is lovely shabby-styled flowers.
I first showed you this style of flower when I added it to my DIY mini faux pallet art sign that I shared here last month. I made a small flower for that project, after reading several tutorials and seeing this helpful video.
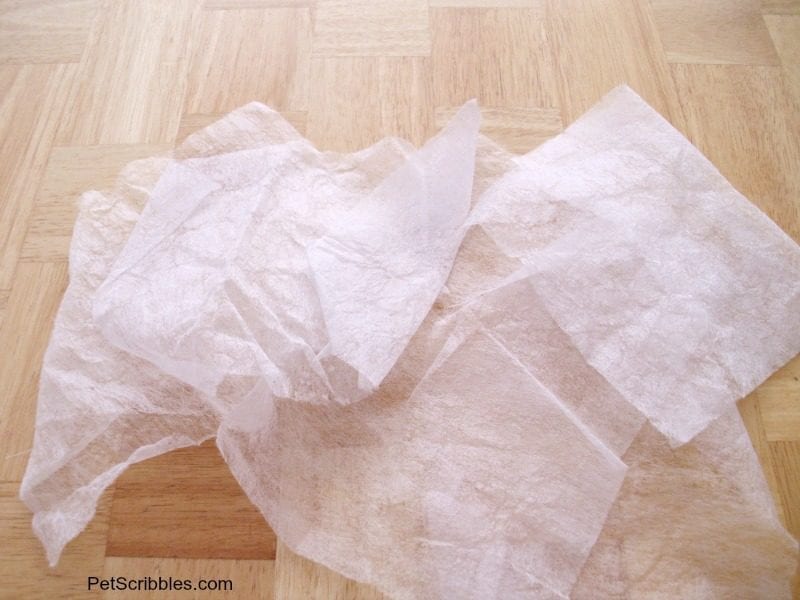
Since that project, I’ve made a few more flowers and definitely am drawn to making them in a larger size. Using full-sized dryer sheets means I can make big, bold flowers perfect to stick here and there as decorations in our home.
Here’s the supplies I used to make the flowers:
- Dryer Sheets (used)
- Wire twisty-ties (like what keeps your bread bags closed)
- Scissors
- Rubber Gloves
- Tattered Angels Glimmer Mist in orange and teal
- Perfect Pearls Mists in heirloom gold and perfect pearl
Let’s get started!
Dryer Sheet Flowers from Used Dryer Sheets
Step 1. Do some laundry.
Yes, now laundry becomes fun, doesn’t it? You have a purpose beyond simply insuring there are clean clothes. Now you are beginning to hoard to start your collection of used dryer sheets.
Step 2. Make two cups of tea.
The first cup is for tea-staining (I think I just made that a verb?) the dryer sheets. The second cup of tea is for you to enjoy. (After all that laundry, you deserve it, right?)
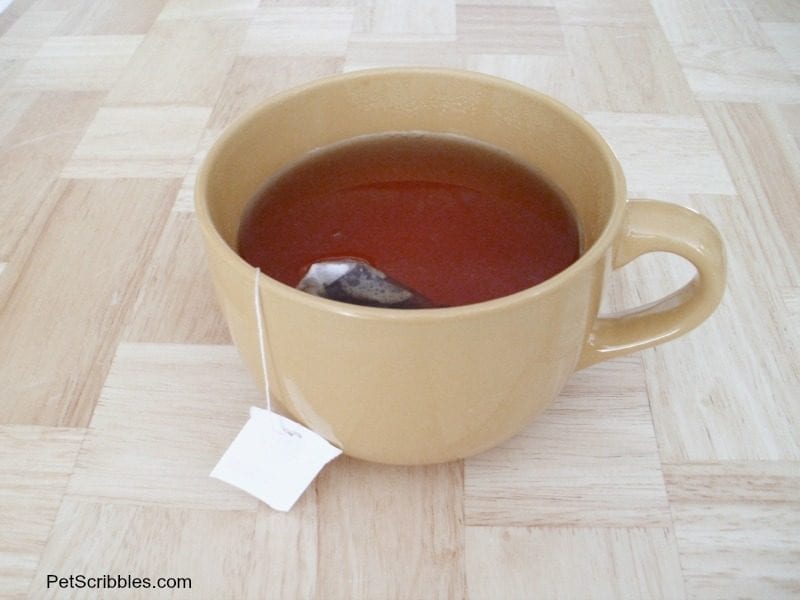
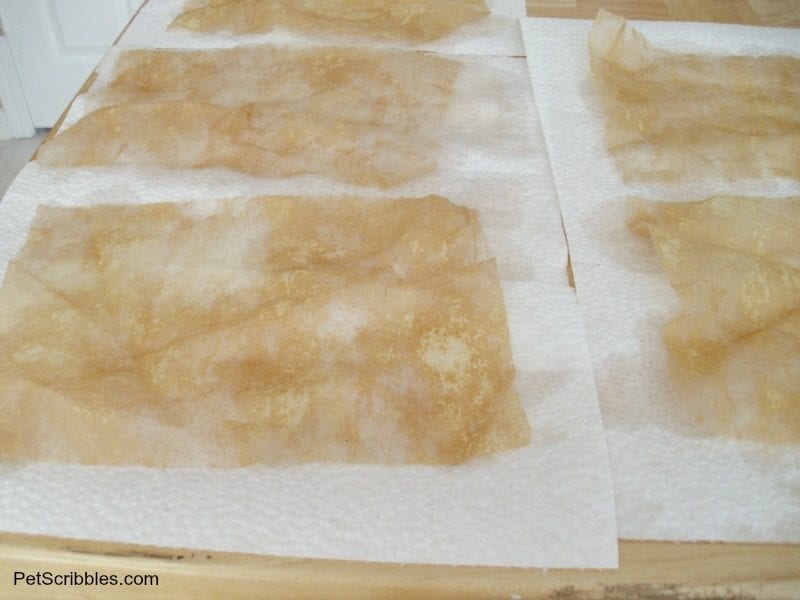
Step 3. Once the tea has steeped for 5 minutes (to get the color nice and rich), remove the tea bag. Place all of the used dryer sheets into the tea bath and use a spoon to make sure they are immersed into the tea.
(I’m using a giant mug that doubles as a soup bowl, but you can’t really tell from these pictures. And yes, I drink my tea out of a giant mug because I need all the help caffeine I can get!)
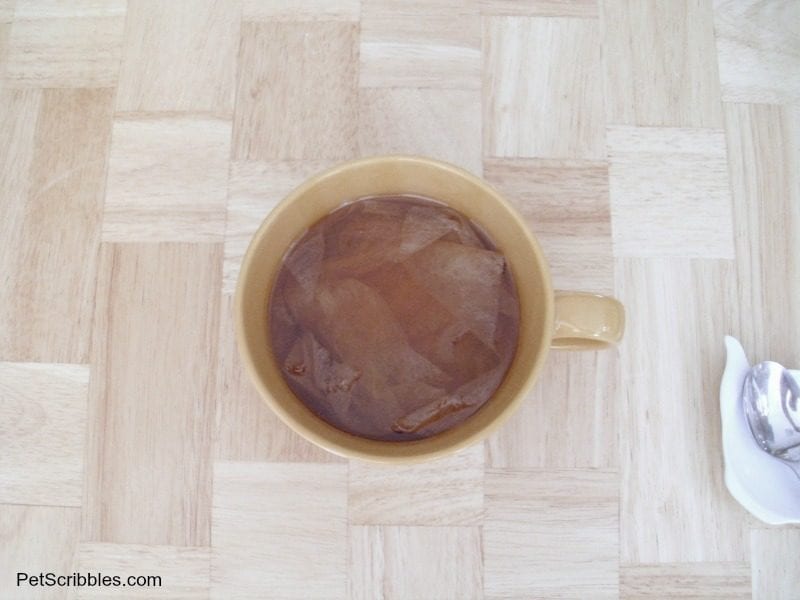
Step 4. Let the dryer sheets sit in the tea bath for about 10 minutes.
Keep in mind that these sheets are delicate, so use a spoon to gently lift them out of the tea bath one at a time. Place each one on a paper towel to dry.
You’ll notice how textured the dryer sheets now look, with the tea staining some parts more than others. For a truly shabby look, you could use this (the tea stain) as your finished color of the flowers. So many decorating possibilities!
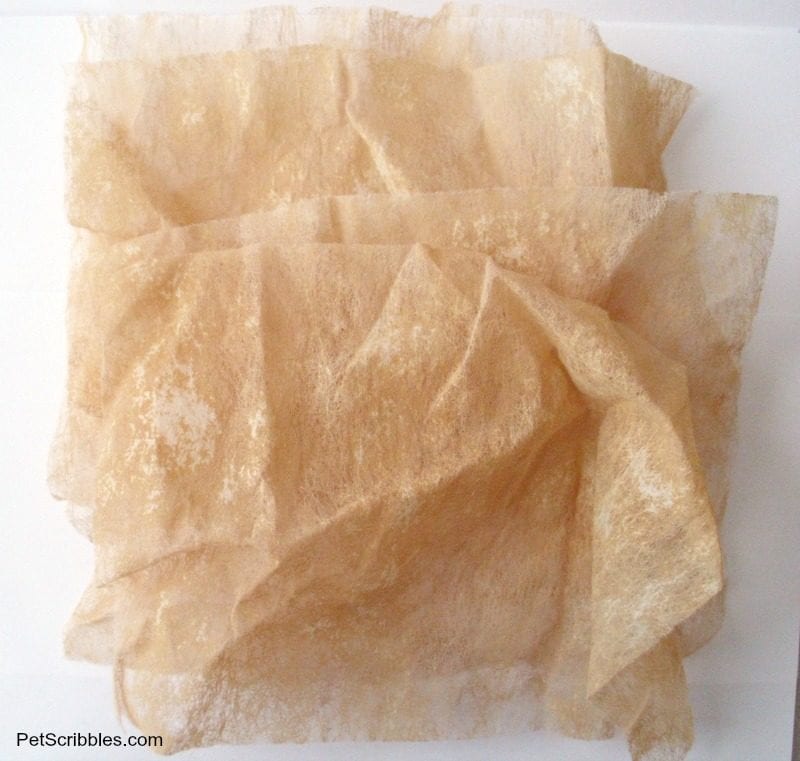
Once completely dry, this is what your pile of dryer sheets should look like:
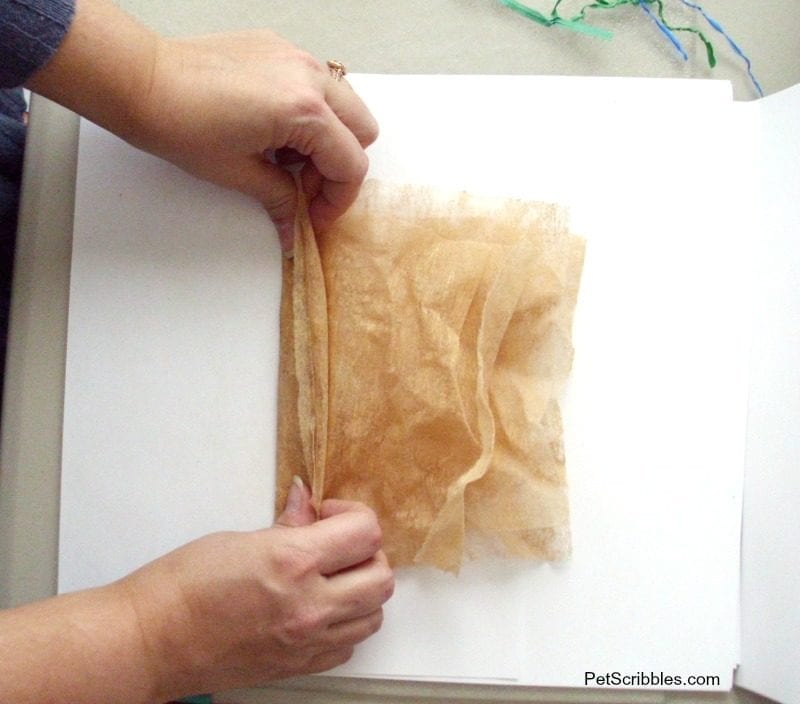
Step 5. Take three dryer sheets, place them on top of each other as lined up as you can make them, and begin folding them back-and-forth in an accordion type of fold.
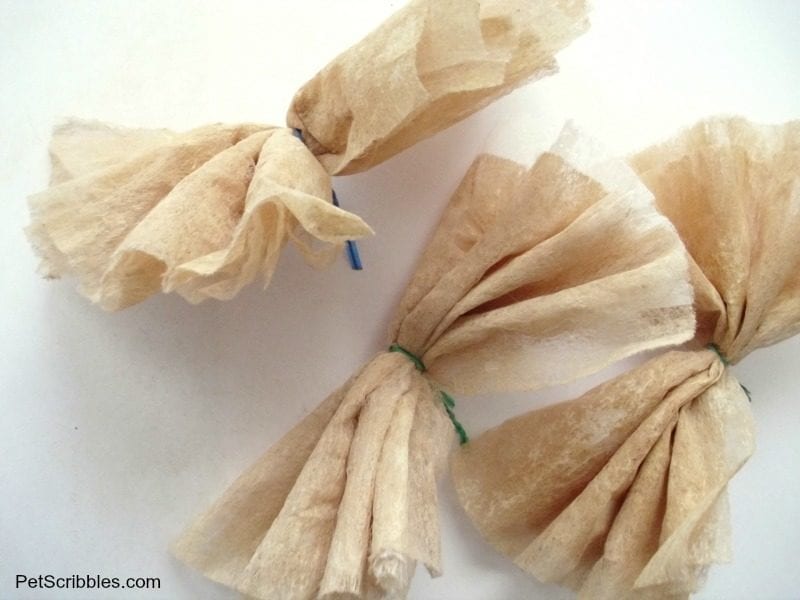
Step 6. Once folded, pinch the center. Wrap a wire twisty-tie (what are these things officially called?!) around the center and twist the ends of the wire together.
This is what your flowers should look like at this stage:
Step 7. Gently pull the layers apart, shaping the cinched-together dryer sheets into more of a flower shape.
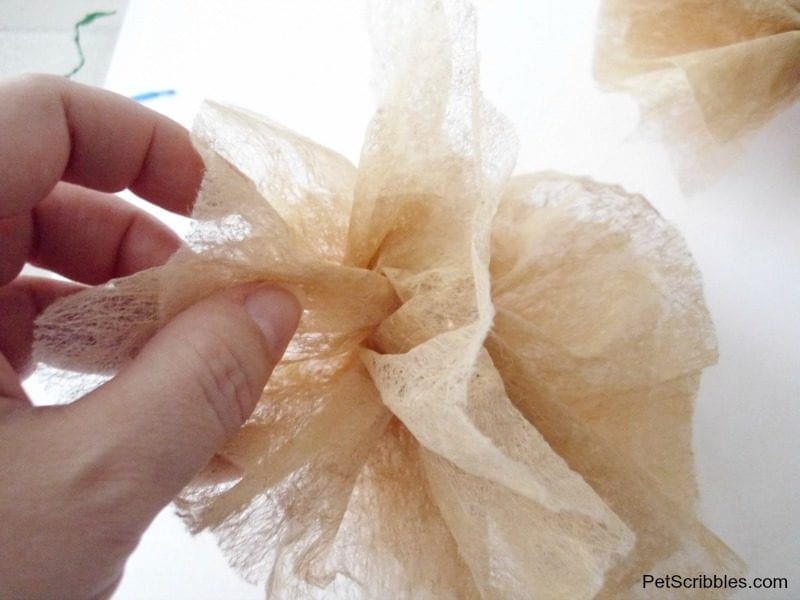
You should have three layers on each side of the flower, a top layer, a middle layer, and a bottom layer. This is what the flowers should look like after you pull the layers apart:
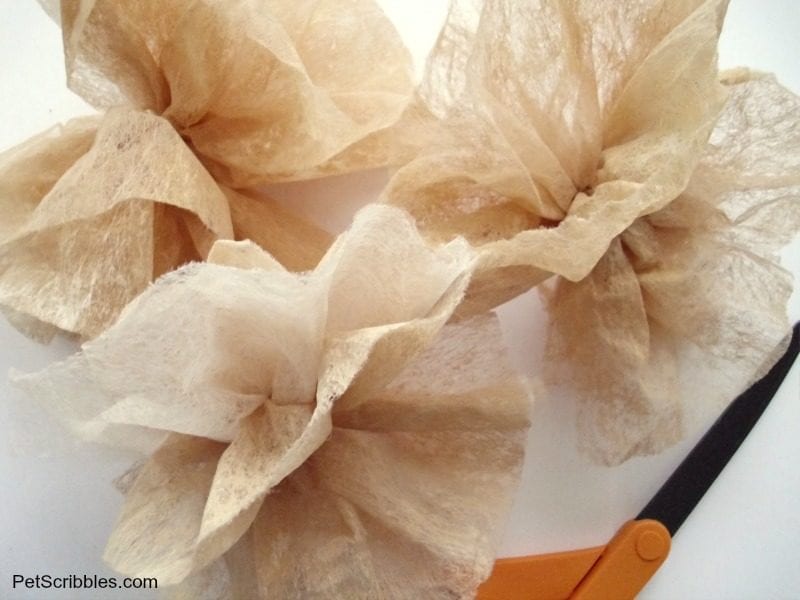
Step 8. Read this entire step first before proceeding so nothing gets messed up.
Next, you need to cut some slits into each layer of the flower using scissors. Each slit needs to only extend approximately half-way down toward the center of the flower. I alternate between making 2 slits and making 3 slits per layer, as it makes the flower fuller. Start with the bottom layer, and cut your slits “sort of” evenly spaced apart. You don’t need to be exact with your spacing, just eyeball it.
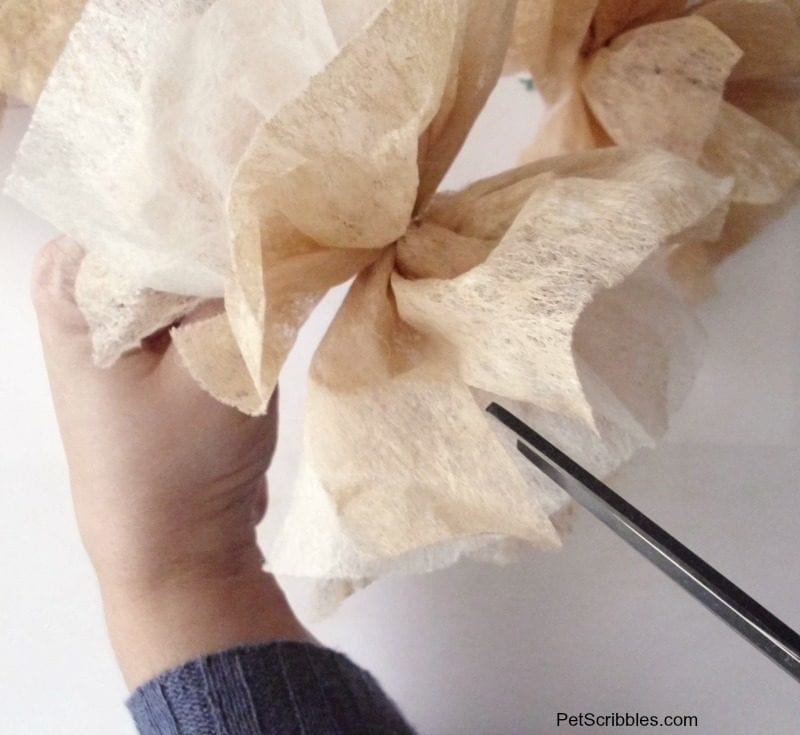
Step 9. Take another wire twisty-tie and attach it to the flower’s twisty-tie.
This makes a longer stem for you to hold while you are dying the flowers.

Dying Dryer Sheet Flowers
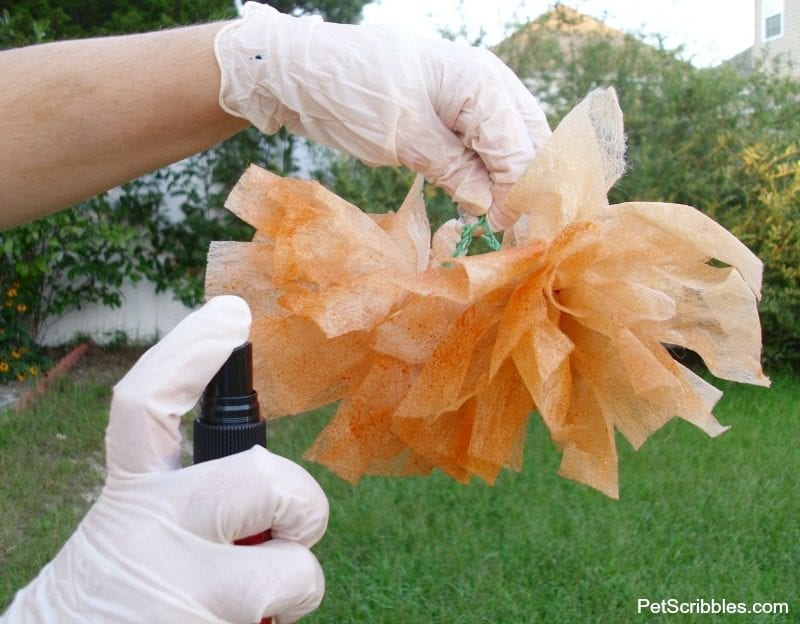
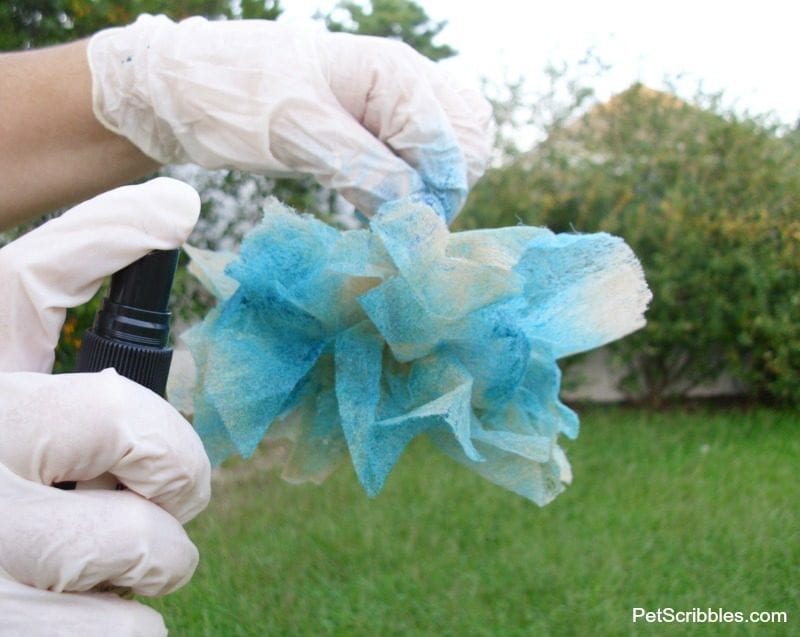
Note for the next step: I use rubber gloves when I do this step, as the dye stains pretty effectively. (And that’s what you want in a dye, so I view it as a good thing!) But no worries, if you get dye on your hands, use a baby wipe to get most of it off. The rest will come off in the shower easily. You can also wash your hands repeatedly like a woman possessed.
Step 10. Holding the flower by its twisty-tie stem, spray the dye ink all over the flower.
I did this outside, but you can also use a box to spray “into” to avoid getting any overspray on your surroundings indoors. I sprayed several light coats onto each flower. There’s no right or wrong way to do this, just spray until you’re happy with the colors. Here’s an action shot (hah!) of me spraying the orange dye:
And here’s an action shot of me spraying the teal dye:
Step 11. Dry each flower with a heat tool, which also sets the dye in each flower.
What is fun about the heat tool, is that it will curl the flower “petals” a bit so that right before your eyes your flower starts looking like a real flower blossom. Keep your heat tool constantly moving so that you don’t singe or burn the dryer sheets. This step is trial-and-error, and after you do just one flower you will have the hang of it. If you accidentally singe or burn part of the flower, you can simply cut that off. But I like that look, I think it adds to the shabby-style, so I always keep my singed edges. In fact, I singe parts of my flowers on purpose.
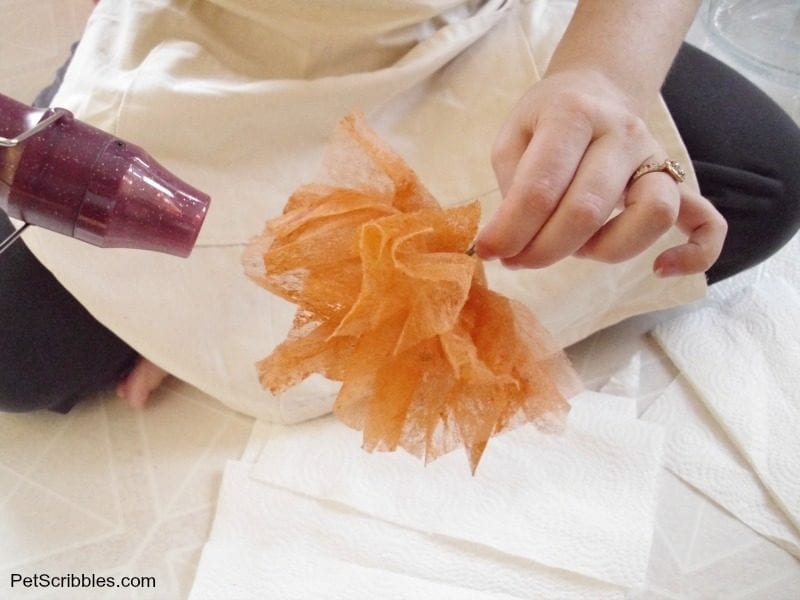
Step 12. Repeat the heat tool step for each flower.
I actually spend quite some time on this step, repeatedly picking up each flower and “heating” several times. Again, you will know when you’re finished with this step: it is as simple as stopping when you like how it looks.
Here’s the flowers dried and curled, along with what looks like my very hairy arms (egads!):
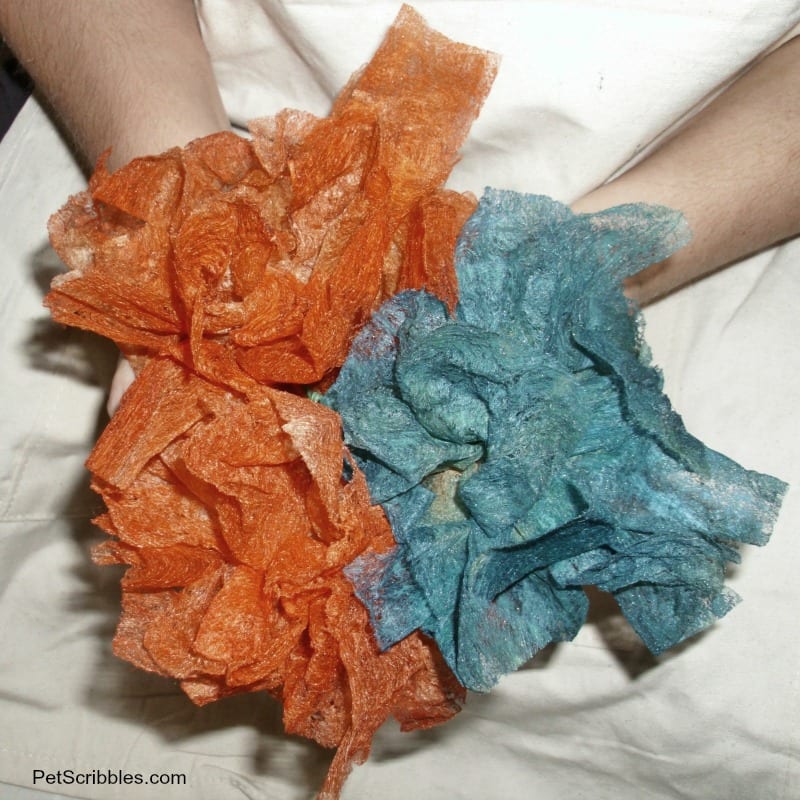
You can stop here and have beautifully dyed flowers. Just use your hands to continue crinkling, teasing, fluffing and arranging the petals until you love how they look. Several of these in a vase are a stunning focal point in a room.
If you want a bit more shimmer . . .
Step 13. Embellish the flowers a bit more by spraying Perfect Pearls Mists in both “heirloom gold” and “perfect pearl” onto various sections of each flower.
These mists are fantastic for giving either a soft and pretty sheen (using a few light sprays) or adding lots of shiny shimmer (using several coats close up). I just gave a few light spritzes onto each flower. And I played with the heat tool a bit more, just to make the flowers even shabbier in style
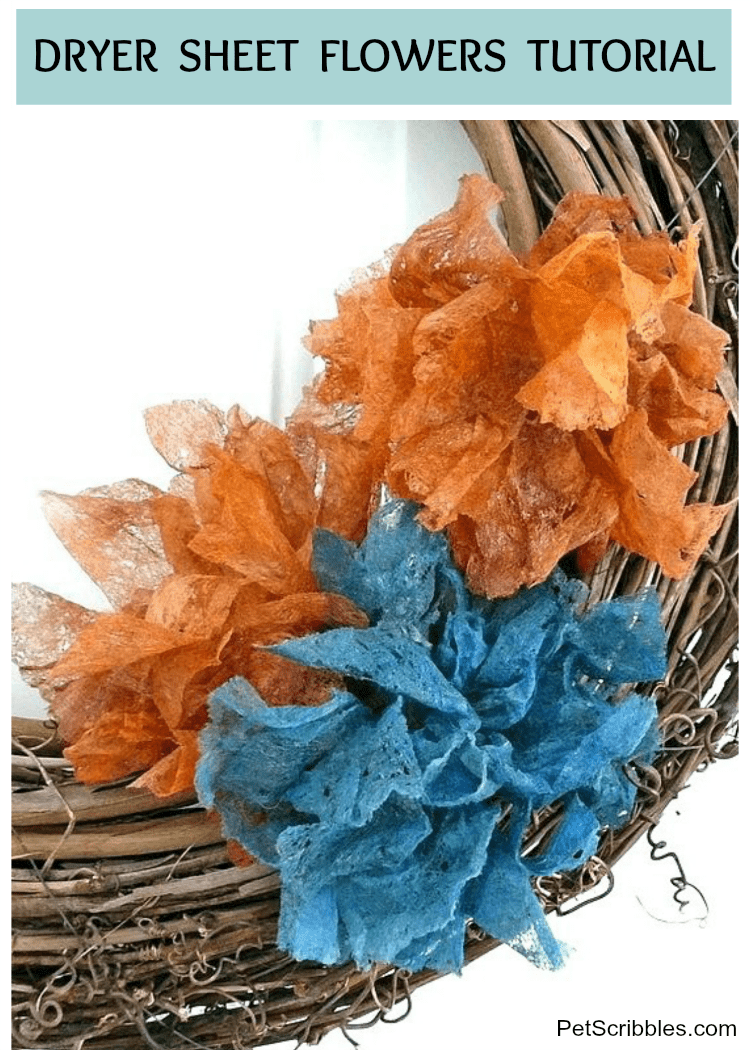
Dryer Sheet Flowers!
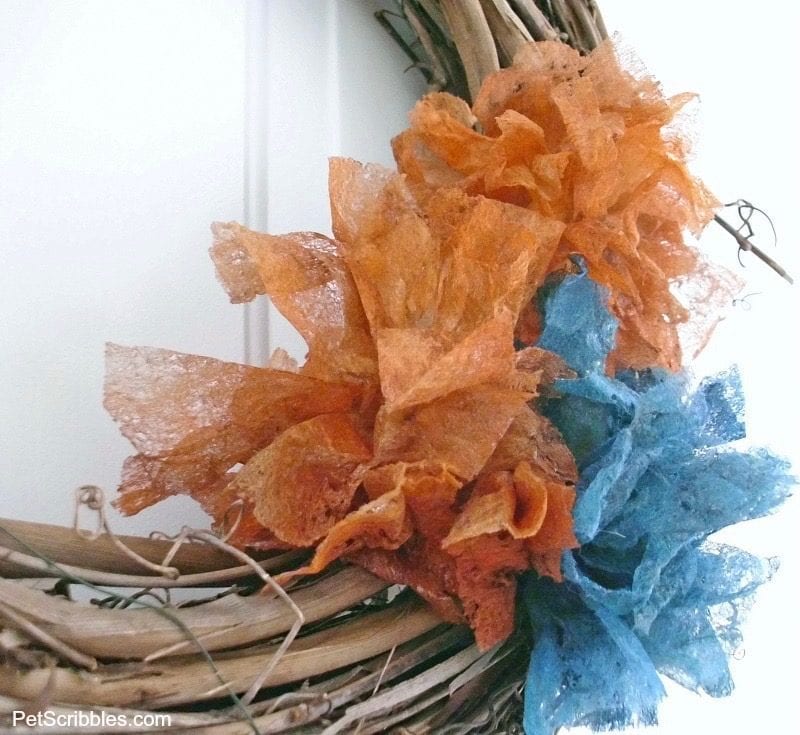
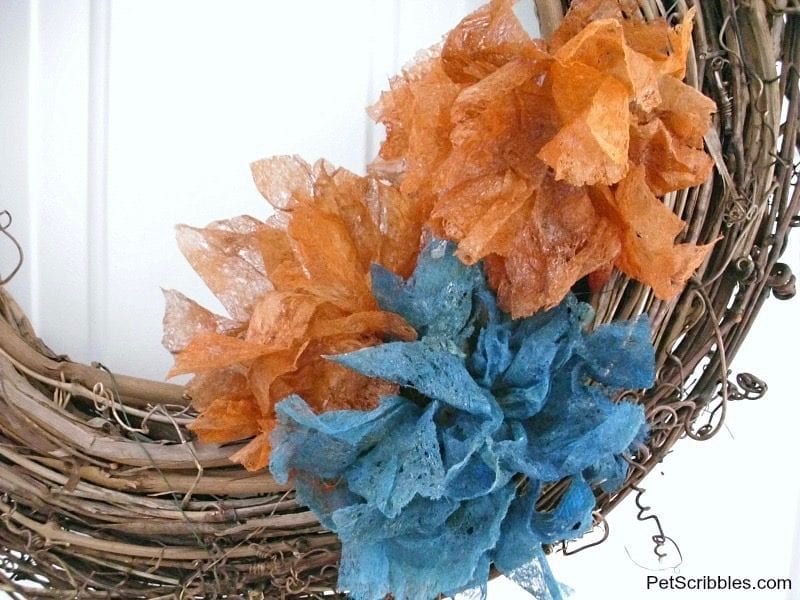
We’ve had a grapevine wreath on the inside of our front door for quite some time now. I loved the simplicity of it, but wanted to give it a touch of Autumn. These dryer sheet flowers ended up being the perfect addition!
(Use the twisty-tie stems to attach each flower to the wreath.)
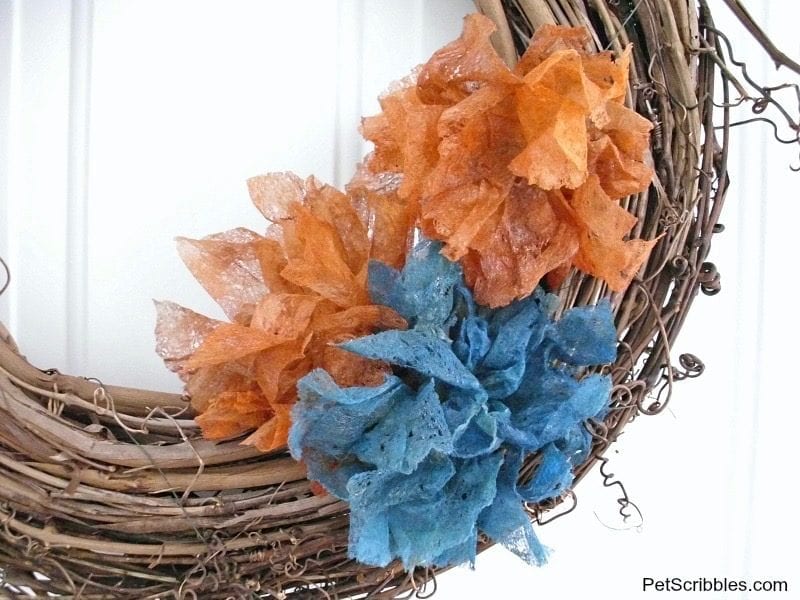
The aqua/teal flower is the accent color we have in our great room, and the orange flowers are a tribute to Autumn.
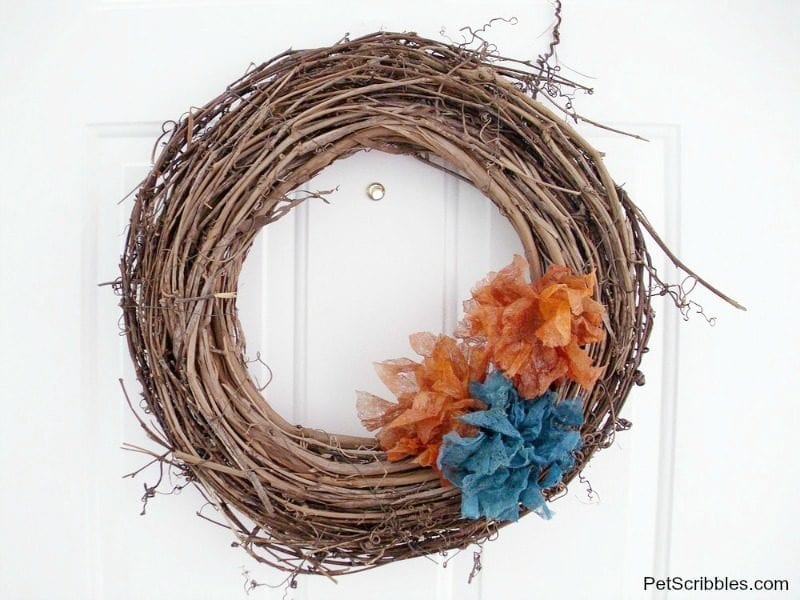
Here’s a side view of the flowers:
I’m looking forward to doing more laundry just to make more dryer sheet flowers in this color combination. I like that I can display these from now all the way through Thanksgiving.
When my husband saw me tea-staining all of the dryer sheets, I jokingly mentioned how it makes me love doing laundry knowing I can use the dryer sheets to make flowers.
His response? “Is there any type of craft that would make you want to use the vacuum more often?”
Happy crafting!
You are totally my sister from another mister I swear it! I was just doing this the other day and thought I was a dang genius. These look awesome! I love love love the blue and what a great idea to put them on a grapevine wreath! We are twins separated at birth…that’s the only explanation 🙂
PS my cat ate another of DH’s sweaters today
Dear Sister, you had me at periwinkle crayon! 😉 Thanks for the compliments and I look fwd to seeing your flowers on your blog too!
I love these, so clever and crafty!
Thanks so much Erin!
Laura, I LOVE the way these look! Great job!!
~Heather
Thank you Heather! 🙂
That is hilarious! It sounds like something my Hubs would say too! Love the wreath and the flowers look great! Pinned & tweeted.
Hah! Sounds like our husbands share similar senses of humor…especially when it comes to our DIY projects! Thanks for sharing my flowers w/ your followers!
That is funny!!! 🙂 These looks incredible!! 🙂
Thanks so much Bonnie and Trish!
What a great idea! Love the colour that you dyed them. Great job.
Thank you Angie! The Glimmer Mist dyes are really rich and vibrant!
Laura!! What a great idea! This seems like the perfect upcycled project. By the way, if you find something to make vacuuming more enjoyable, please share! 😉
Thanks Michele! As for vacuuming, I think my husband is thinking of ways I could craft with the vacuum “lint” that accumulates! LOL
How pretty and simple!! I LOVE the final look! I am going to have to start thinking about what to do for my fall decor…. you may have just helped me!! Thanks for the inspiration!
Jaime from crafty scrappy happy
Awww, thanks so much Jaime Lyn! Let me know if you make some of these flowers! I’m getting ready to make more…that is, getting ready to do more laundry. Hah!
these are so flippin’ fabulous!
Thanks Karah! You just made me smile! A huge smile! 🙂
Great tutorial and gloves….now thats a good idea…lol
Very funny about your husband and vacuum/
Thank you! loved your post.
Thanks Kim, glad you liked it!
Do ya HAVE to do laundry first? Could ya use them to make flowers straight from the box, since they smell so pretty!
Good question Brenda – especially if you’re sick of doing laundry! Hah! I have not tried to make these flowers with unused dryer sheets, but due to the differences in texture — from how they feel before use versus how they feel after use — I have a feeling that making these flowers out of the USED dryer sheets will work much better. 🙂
This is such a fantastic tutorial! Visiting from the Vspot. Pinning this and trying soon. I have tons of dryer sheets in my trash in my laundry room!
Thanks Karen – so glad I’ve found the solution for your dryer sheets! 😉 Let me know if you make some, as I bet you’ll come up with something fabulous! 🙂
Love your wreath and the beautiful fall colors of your flowers… I pinned this too, they aren’t just for laundry anymore… I found you through the Answer is Chocolate Link Party where I have the following projects linked; Spooky Halloween Card and Subway Art Printable, would love it if you’d stop by too. Hugs, antonella 🙂
Thanks so much Antonella! I love your Halloween card DIY – especially the 3D spider! 🙂
I just love this Laura! I will be featuring it when my link party opens up tonight. Cannot wait to play with some dryer sheets.
Girl, you made my night! 🙂 Thanks so much and definitely can’t wait to see some flowers from you!
Hello Laura, fellow featured friend at The Answer is Chocolate…
As I’ve previously commented, love these flowers!
I stopped by to let you know I’ve pinned your project and included it in my Thank You post. Hugs, Antonella 🙂
Thanks so much Antonella! Love that we were both featured! And thanks for sharing my flowers with your readers too! Icing on the cake! 🙂
So clever Laura! Facebook is notorious for not notifying page owners when I tag them and share their stuff, so I thought I would stop by myself and let you know 🙂 These were a hit with my Facebook audience!
Oh wow Amanda – I am SO glad you posted this here, as I would have NEVER seen it otherwise! First off – I can’t stand how Facebook doesn’t notify us when we’re tagged on another page, and secondly – I also can’t stand that pages I like – like yours – don’t regularly come up in my feed. Thank you SO much! I’m thrilled your readers like this project!