• Skip to primary navigation
  • Skip to main content
  • Skip to primary sidebar
  • Home
  • Gardening Index
  • Videos
  • Subscribe
  • Navigation Menu: Social Icons

    • Facebook
    • Instagram
    • Pinterest
    • RSS
    • Twitter
    • YouTube
Garden Sanity by Pet Scribbles

Altered Moo MiniCards Box

This post and photos may contain Amazon or other affiliate links. If you purchase something through any link, I may receive a small commission at no extra charge to you. Any supplies used may be given to me free of charge, however, all projects and opinions are my own.


July 20, 2012 By Laura

Pin
Share
Post
Make an adorable altered box to stash special things out of a basic blank box. This is a fun project using craft supplies you already have in your stash!
Altered box with vintage images!

I know I’m not alone when I profess my love for my Moo MiniCards. If you’re not familiar with Moo, you need to click here to check them out. They offer various business card sizes, stickers, and other handy printed necessities for your business. This is not a sponsored post – just me professing my love not only for my cards but also for the über-handy box that houses them.

Altered Moo MiniCards Box
Just a few of my own Moo MiniCards for Pet Scribbles

Here you can see a few of my business cards. In my latest batch, which is almost gone, I ordered five different designs (as seen in the image above), each with the same business info on the back. Except for the vintage image of the girl with the dog – which I use as my logo – the other designs are sections of my greeting card designs. I send these out with my Etsy orders, in addition to handing them out whenever needed. My customers love them, so each time I need to reorder more MiniCards, I choose different card designs to keep it fresh. (Note to self: make sure I add my blog info to the next order!)

Altered Moo MiniCards Box
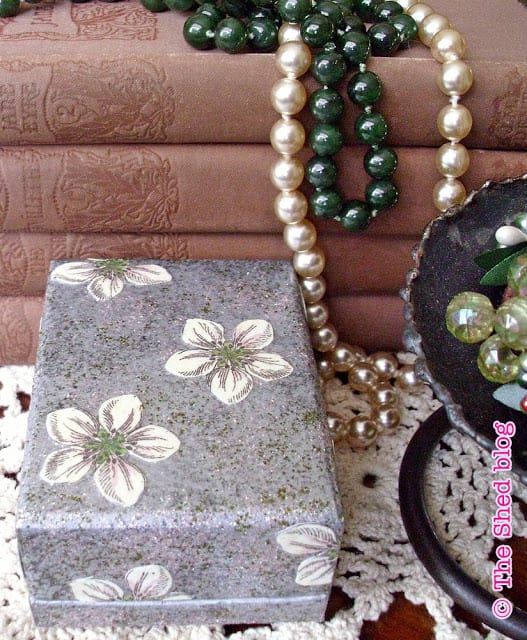
The Moo MiniCards box

I also love the cardboard box, because it can be used for so many things once it’s empty of MiniCards. It’s the perfect blank to turn into an altered box. The dimensions of this tiny box, when closed, are approximately 3″ length x 2.25″ width x 1.5″ height. A tiny treasure box! Well, not yet. It is made of a recycled pulp – feels like cardboard – and is white except for the little logo. And the inside is the same fuchsia shade as the Moo logo on the outside. This is a perfect box to repurpose.

So let’s do this!

Altered Box (from a Moo minicards box)

Altered Moo MiniCards Box
Supplies

I knew I wanted to do something fancy and glittery. And I had an interesting color palette in my head too: silver, dark grey, olive, and pink. I admit that it came from the way my supply of Stickles were tucked into their spot on my shelves. Those colors were next to each other and looked pretty cool. So that’s as far as I thought through the first part of this project. I’m sure many of you can relate to starting a project before you know what you want the end result to be!

Supplies used:
Acrylic craft paints in Metallic Silver and Black
Stickles glitter glue in Silver and Cotton Candy
Distress Stickles glitter glue in Peeled Paint
Mod Podge for paper (matte)
Mod Podge Sparkle
Craft foam brush
Sea sponge
Peanut butter lid
Krylon Clear Finish acrylic sealer (matte)
Vintage floral images (optional)

Step One:  Using a small part of a sea sponge, cover the outside of the box with silver paint. Let dry, and rinse out your sea sponge while you’re at it. Once the box is dry, dip the sea sponge into black paint, dab a few times onto scrap paper, and then apply randomly over the silver paint, keeping the silver showing through. (See image below.) Again, let dry and rinse out the sponge.
Altered Moo MiniCards Box
The box at the conclusion of Step One.

Step Two:  Using the sea sponge again, dip it into the silver paint, dab a few times onto scrap paper, and then apply randomly all over the box. This will “mute” the black color. Let dry and – say it with me – rinse out the sponge. You will begin to see a nice texture building up from the paint being applied in this manner.
Step Three:  Once dry, it is time to play with glitter! I decided to experiment, and used the sea sponge to apply each layer of glitter. I loved how it worked, as it just added more and more texture to the box.
Squirt some Silver Stickles onto scrap paper . . .
Altered Moo MiniCards Box
Squirt out your Stickles…

Dab the sea sponge into the glitter glue, and apply in a random fashion all over the box.
Altered Moo MiniCards Box
Use a sea sponge to apply the Stickles.

Here’s the box after the silver glitter was applied and left to dry . . .

Altered Moo MiniCards Box
with silver glitter…
Here’s the box after the pink glitter (Cotton Candy) was applied and left to dry . . .
Altered Moo MiniCards Box
with pink glitter…
Here’s the box with the olive glitter (Distress Stickles Peeled Paint) applied and left to dry . . .
Altered Moo MiniCards Box
with olive glitter…
Distress Stickles performs the same way that regular Stickles does. The difference is that the bits of glitter are different sizes, have more of a matte finish, and the colors match the Tim Holtz Distress line of ink pads, crackle paints, stains, etc. While the Distress Stickles gave me even more fabulous texture on this box, my choosing it over regular Stickles was merely because I had it on hand in the shade I wanted.
Step Four:  Once the final layer of glitter has dried, spray the box with a light coat of the acrylic sealer.
Step Five:  Contemplate the box. Stare at the box. Spend lots of time thinking about what to do with the box. How to alter it further… This step could quite possibly have taken the longest out of the entire project. Hah!
Step Six:  I decided the box needed something decoupaged all over it, and chose one of my favorite vintage floral images. I printed it out on 65 lb white paper, sprayed the front and back with acrylic sealer and let it dry. Once dry, I cut out the individual flowers, including some partial flowers to use on the edges of the box. As you can see in the image below, I also began to map out where the flowers would be placed on the box.
Altered Moo MiniCards Box
Cut out your images to be Mod Podged.

Step Seven:  Mod Podge time! Using the Paper Mod Podge, apply a small amount with your craft foam brush onto the surface where you will place a flower. Also apply Mod Podge to the back of the flower, carefully place onto the box, smoothing out from the middle to the edges as you go. Wipe any bits of glue that seep out of the edges with your finger. Repeat for each flower.

Altered Moo MiniCards Box
The floral images are ivory, with bits of pink, green and grey.

Step Eight:  Once all flowers are applied, let dry. Once dry, cover the flowers, and then the entire box with a coat of Sparkle Mod Podge. Let dry. Give the entire box a final coat of acrylic sealer.
Voilá! A pretty altered box, just waiting for something special to be placed inside!
Altered Moo MiniCards Box


I love how different the box looks from its original form. And the supplies are all things I used from my own stash, so this special little box didn’t cost me a thing to repurpose.
Next time you have some packaging that you’re about to toss into the recycle bin, consider repurposing it into something special like this little altered box!
~Laura


Pin
Share
Post

Filed Under: Crafts & DIY Tagged With: altered box, Altered Moo MiniCards Box, Craft Tutorials, decoupage, DIY, Fuchsia, fuschia, gift box idea, glitter project, handmade gift ideas, mod podge, Moo Cards, Moo MiniCards, vintage floral images

Previous Post: « Tie Dye Tutorial: Easy Free Hand Technique
Next Post: Watership Down in our backyard! »

Reader Interactions

Comments

  1. Eightymillion/Jennifer

    July 21, 2012 at 3:29 am

    Way to recycle! Love it!

    • Laura/Pet Scribbles

      July 21, 2012 at 4:50 pm

      Thanks Jennifer! ๐Ÿ™‚

  2. Laura @ House Of Joyful Noise

    July 24, 2012 at 11:20 pm

    I do love moo cards too, but haven’t ordered in a long time. Are they still out of the country?
    Anyhoo, what a great idea, to make the box into something so pretty and useful! Going to tweet this. ๐Ÿ˜‰

    • Laura/Pet Scribbles

      July 25, 2012 at 12:35 am

      Thanks for the tweet Laura! Moo has a US site now, but I think their home office is still in the UK. ๐Ÿ™‚

Primary Sidebar


Welcome to Garden Sanity by Pet Scribbles. Iโ€™m Laura, an artist and self-taught gardener. Gardening is therapeutic for me, peaceful and calming. I write articles and film videos centered around my own gardens, with plenty of plant suggestions and gardening tips. Iโ€™m glad youโ€™re here and happy to share my garden inspiration with you!

As an Amazon Associate I earn from qualifying purchases.

As an Amazon Associate I earn from qualifying purchases.

© 2025 โ€ข PET SCRIBBLES LLC โ€ข PRIVACY POLICY