• Skip to primary navigation
  • Skip to main content
  • Skip to primary sidebar
  • Home
  • Gardening Index
  • Videos
  • Subscribe
  • Navigation Menu: Social Icons

    • Facebook
    • Instagram
    • Pinterest
    • RSS
    • Twitter
    • YouTube
Garden Sanity by Pet Scribbles

Tie Dye for Men: Easy Off-Center Stripe T-Shirt Tutorial

This post and photos may contain Amazon or other affiliate links. If you purchase something through any link, I may receive a small commission at no extra charge to you. Any supplies used may be given to me free of charge, however, all projects and opinions are my own.


May 29, 2013 By Laura

Pin
Share
Post
13Shares
Yesterday, I shared three ways to tie dye tank tops for easy Summer fashions once the weather starts heating up. But why should just us gals have all the fun? How about a tie dye project that you can do for your special man?


Tie Dye for Men: Easy Off-Center Stripe T-Shirt Tutorial
What guy doesn’t like a bit of tie dye, even if it’s just a t-shirt he will only wear when mowing the lawn? Luckily, my husband is a t-shirt loving guy so I know this one will get lots of wear!


This is another “how-to” on creating an off-center vertical stripe design using tie dye. It’s very simple to do. I’ll refer you to my original off-center tie dye tutorial, for all of the nitty-gritty details and instructions on how to do this, including preparation.


What follows here is an overview so you can get the general idea of how this is made.


Preparations


Included in your preparations, don’t forget to read the package instructions for whichever type of dye you are using for this project. I used the Tulip one-step tie dyes. No, this isn’t a sponsored post. Yes, I do like how easy these dyes are to use!


Tie Dye solutions: make sure to read package instructions carefully!


Steps 1 through 4:
How to tie dye a man's t-shirt!


1. Take a damp white t-shirt and fold it accordion-style from the top (neck) to the bottom hem. Decide how many sections you want, and attach rubber bands along the t-shirt, dividing the folded shirt into sections and spacing them however you would like.


2. One of these sections will be your vertical “stripe” design down the front and back of your shirt. I purposely chose a section that is “off” of the center of the shirt, which you’ll see is being dyed green.


3. The remaining sections get saturated with the blue dye, except for one end section which I also dyed green. Try not to get too close to the rubber bands, so the colors don’t get mottled and muddy if they combine. The dye is quickly absorbed by the fabric, and will travel and spread a bit beyond where you aim it anyway.


4. Turn your t-shirt over, and do the same dying to the back side.


Steps 5 through 8:
Make a tie dye t-shirt for Father's Day. A great project for the kids!

5. I try and saturate each section when I’m tie dying in this way, leaving hardly any white, keeping in mind there will be lots of white tucked in among the accordion folds that will appear in your final design.

6. I decided to make one of the end sections green as I mentioned in Step 3. This end, just like in my original tutorial here, provides a neat vertical stripe right along the side seam of the t-shirt and onto the sleeve.

7. Keeping the rubber bands in place, simply roll up the t-shirt in plastic, covering it up completely, including tucking the ends of the plastic in. Follow package instructions for how long to let the dye set inside the plastic covering.

8. Once time is up, and while still keeping the rubber bands in place, rinse the t-shirt thoroughly in cold water. You want to rinse it until the water runs clear. Remove the rubber bands and rinse again until the water runs clear.

Wash before wearing!

Wash the t-shirt separately in a cold water setting and let air dry. (I washed this t-shirt twice, just to be sure the remaining dye was only on the garment and not going to rub off on anything else.)

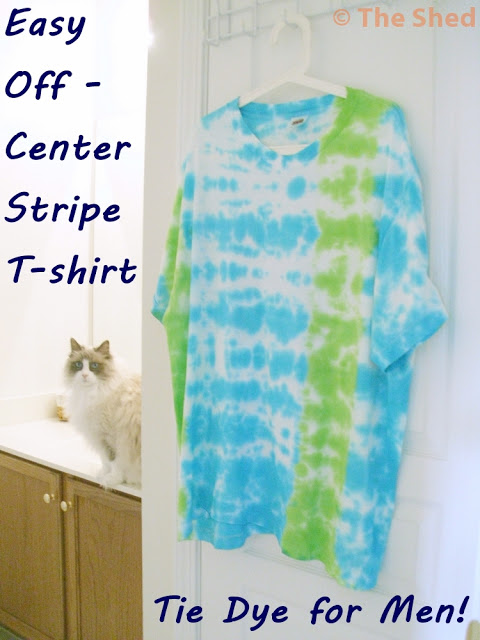
And here’s the t-shirt!

Men's Tie Dyed T-Shirt - how to make your own!
Front of the t-shirt – see the green stripe down the side, as well as the off-center stripe?

I love how the white goes across the shirt horizontally, while the green stripes are vertical. This is the result of doing the accordion folds from the top to the bottom of the t-shirt.

Mix accordion folds and rubber bands for unique stripe tie dye patterns!
Back of the t-shirt

If, for example, you chose to accordion-fold the t-shirt starting from the left side to the right side, then the white would be vertical and the two green stripes would be horizontal. And depending upon where you choose to make the stripes and what colors you use will provide all sorts of variations too!

How to tie dye a t-shirt with an off-center stripe!
Lulu sometimes works as Quality Control. Here she is inspecting my work.

Kids love to tie dye t-shirts, so consider turning this into a fun craft project that the kiddos can do. End result? Dad gets a fun and stylish t-shirt, maybe for Father’s Day! And maybe the kids make some for themselves too!

Definitely a fun project to kick off your Summer!

~Laura


Pin
Share
Post
13Shares

Filed Under: Crafts & DIY, Summer Crafts Tagged With: Craft Tutorials, DIY, Father's Day, Gifts for Men, how to tie dye, ILoveToCreate, kids crafts, off-center stripe tie dye, tie dye fashion, tie dye technique, tie dye tutorial, tie dye your summer, Tulip Tie Dye Kits

Previous Post: « How to Tie Dye Tank Tops, 3 ways!
Next Post: Loving a Feral Cat named Aliza »

Reader Interactions

Comments

  1. Vivienne @ the V Spot

    June 4, 2013 at 5:41 pm

    I love tie-dye!

    • Laura / The Shed by Pet Scribbles

      June 5, 2013 at 2:06 pm

      So easy and the results are so satisfying, right? 🙂

  2. malia

    June 6, 2013 at 1:21 pm

    COOL Laura! You have taken the already fabulous tie-dye and given it an upgrade. This would be a great kid’s project too. xoxo

    • Laura / The Shed by Pet Scribbles

      June 6, 2013 at 10:52 pm

      Thanks Malia! I agree – kids making this either for themselves or as a kid for dad would be fun!

Primary Sidebar


Welcome to Garden Sanity by Pet Scribbles. I’m Laura, an artist and self-taught gardener. Gardening is therapeutic for me, peaceful and calming. I write articles and film videos centered around my own gardens, with plenty of plant suggestions and gardening tips. I’m glad you’re here and happy to share my garden inspiration with you!

As an Amazon Associate I earn from qualifying purchases.

As an Amazon Associate I earn from qualifying purchases.

© 2025 • PET SCRIBBLES LLC • PRIVACY POLICY