• Skip to primary navigation
  • Skip to main content
  • Skip to primary sidebar
  • Home
  • Gardening Index
  • Videos
  • Subscribe
  • Navigation Menu: Social Icons

    • Facebook
    • Instagram
    • Pinterest
    • RSS
    • Twitter
    • YouTube
Garden Sanity by Pet Scribbles

Spring Spool Craft Tutorial

This post and photos may contain Amazon or other affiliate links. If you purchase something through any link, I may receive a small commission at no extra charge to you. Any supplies used may be given to me free of charge, however, all projects and opinions are my own.


March 7, 2013 By Laura

Pin
Share
Post
734Shares
Spring Spool Craft Tutorial

I purchased some basic wooden spools on a recent trip to Michael’s, because I love miniature crafts and I particularly love all of the spool crafts I’ve been seeing everywhere. I’ve captured some of my favorites on my Pinterest board simply titled Spool Craft Ideas.

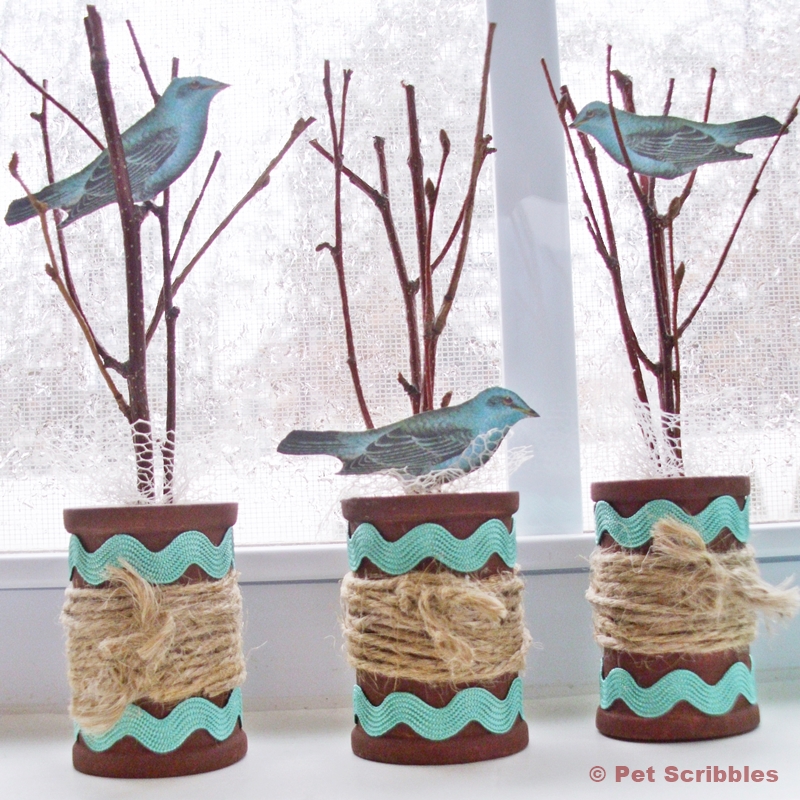
Although I wasn’t sure what I would create with these spools, I knew I wanted to make a Springtime craft. I wanted my craft to be something I could display in our home throughout the Spring season, rather than a holiday-specific decoration. And I knew I wanted something for our mantel, which has a TV hanging above it (please don’t judge me), meaning whatever I came up with needed to be small. Our color palette in our living room is browns and taupes with mixes of teals and pale ice aquas as our accent colors. So I began by painting the spools brown.

Spring Spool Craft Tutorial | The Shed blog by Pet Scribbles

In the photo above, the brown paint is sitting inside of a lid I recycled from an empty peanut butter jar. These lids make fantastic paint holders.

I applied two coats of brown craft paint onto the spools. Since I was going to be covering most of the spools with ribbon and twine, I wasn’t too concerned with any parts that weren’t fully covered by the paint. Let the paint dry.

Spring Spool Craft Tutorial | The Shed blog by Pet Scribbles

The plastic jar below says Cucumber Salad but obviously it’s holding my twine and string collection instead. The label always reminds me how delicious that salad is!

Spring Spool Craft Tutorial | The Shed blog by Pet Scribbles

When we had our Oktoberfest Party last Fall, I tied up the outdoor decorations onto our pergola using twine. When it came time to take those decorations down, I kept every single piece of twine, even though it meant lots of pieces with knots in them. I just stuffed them into this jar, confident that I’d be using them at some point in my crafting. See honey? I’m not simply a hoarder. I’m a craft supply hoarder!

I used the knots to my advantage. I decided to cut off most of the knotted strings, just leaving two small pieces which resembled a shabby bow, and then wrapped the twine around the spool using a strong glue to hold the twine in place.

Spring Spool Craft Tutorial | The Shed blog by Pet Scribbles
I heart Aleene’s Turbo Tacky Glue! I have an unholy fear of glue guns. There. I said it. It’s out there now. A weight has been lifted off my shoulders, having carried that dark secret around for way too long.
After doing tons of research, I decided to try Aleene’s Turbo Tacky Glue as my substitute for hot glue from a glue gun. And you know what? It works just fine and negates my need for a glue gun.
I used the shabby bow as the center front of each spool. I applied the glue to the back of the knotted center, pressed it to the spool and held it there for about a minute, and then carefully wrapped each end of the twine around the spool, applying tiny bits of glue here and there to adhere the twine to the spool…all the while pressing carefully. Here’s what the first spool looked like once the twine was wrapped around and glued.
Spring Spool Craft Tutorial | The Shed blog by Pet Scribbles
Next, I took some wonderful ric-rac trim in the perfect shade that matches our living room and glued it to the top and bottom areas of each spool. This ric-rac is probably the closest I’ve gotten yet to the chevron trend. Ha!
Spring Spool Craft Tutorial | The Shed blog by Pet Scribbles
Simply apply a small dot of glue to the ric-rac as shown above. I purposely left the ends without any glue, to make it easy to hold and attach. Once the ric-rac was adhered, it was easy to slip another dot of glue under each end. Here’s what the spool looked like once the ric-rac was attached, both front and back views.
Spring Spool Craft Tutorial | The Shed blog by Pet Scribbles
Yes, I know. My ability to correctly measure the length of the twine and ric-rac needs some work. When I saw how it looked from the back, I simply decided this would not be a Spring craft “in the round” so to speak. Unless someone nosy wants to pick these spools up off of our mantel to examine them. It could happen.
Spring Spool Craft Tutorial | The Shed blog by Pet Scribbles
Now for the finishing touches. I scored some fabulous stuff at a neighborhood garage sale last Summer. In fact, I still wonder if the owners fully comprehended why I had such a happy, maniacal look on my face as I loaded up bag after bag of goodies! I got this box of twigs. Yes I know, go outside and snip some twigs off your trees Laura. But think of it: how easy to have a box of twigs for crafting! I also scored this wide roll of tulle ribbon. The tulle wasn’t in the greatest condition, but that just means it’s perfect for my own use: the shabbier, the better, right?
Spring Spool Craft Tutorial | The Shed blog by Pet Scribbles
I simply cut a square of the tulle and placed it over the hole in the top of the spool. My inspiration for the twigs came from this craft by Cathe of Just Something I Made. (Cute, right? Love those nests!) I chose some twigs that would stand up primarily straight, and that resembled bare trees, and stuck them down the center of the hole. As the twigs went down, they pulled the tulle (rhyme alert!) with them, creating a natural ruffled look as you can see here in this extreme closeup!
Spring Spool Craft Tutorial | The Shed blog by Pet Scribbles
The top of each twig was bare, as shown in another of my famous extreme closeups below! I dabbed some brown paint on the ends and it looked much better. I wasn’t sure what else was needed, but I knew I wanted to use a vintage image or two or three. Flowers weren’t an option because…well…because I tried it and didn’t like how it looked. (Good reason, right?) So I did what any crafter would do: I decided to put a bird on it! (Crafters will laugh at this meme. If you don’t get it, trust me that it’s hilarious! And that I crack myself up sometimes. A lot, actually.)
Spring Spool Craft Tutorial | The Shed blog by Pet Scribbles
I remembered this fabulous image from The Graphics Fairy. I cropped the bird and then printed four copies, with two of them reversed for some bird variety, and then carefully cut the birds out. I used three of these pretty birds and placed them in different parts of each tree.
Spring Spool Craft Tutorial
And now I had my early Spring decoration, perfectly sized for our living room mantel!
Spring Spool Craft Tutorial | The Shed blog by Pet Scribbles
Happy early Spring!

~Laura


Pin
Share
Post
734Shares

Filed Under: Crafts & DIY, Spring Crafts Tagged With: Aleene's, Craft Tutorials, Just Something I Made, miniature crafts, put a bird on it, spool craft, Spring decor, The Graphics Fairy, Turbo Tacky Glue, wooden spools

Previous Post: « How to Stencil a Canvas Tote Bag
Next Post: Painted Easter Eggs »

Reader Interactions

Comments

  1. Carol TheAnswerIsChocolate

    March 7, 2013 at 10:17 pm

    Love these! So Springy and great color combination! Pinning.

    • Laura / The Shed blog by Pet Scribbles

      March 10, 2013 at 3:00 am

      Thank you so much Carol! I love this color combo too and feel like it has real staying power, versus some of the trendy color combos that come and go. 🙂

  2. Margot Potter

    March 14, 2013 at 5:49 pm

    Oh, I LOVE THESE! So cute! Thanks for joining the Linky Love party!

    • Laura / The Shed blog by Pet Scribbles

      March 14, 2013 at 7:35 pm

      Why thank you! You just made my day not so random, but a bit more special! So thanks for that! 🙂

  3. Heather SettingforFour

    March 17, 2013 at 1:13 am

    love the pretty embellishments you used and of course the adorable birds! Beautiful for spring Laura – thanks so much for sharing it at Project INspired!

    • Laura / The Shed blog by Pet Scribbles

      March 18, 2013 at 11:58 am

      Thanks Heather! I really enjoyed the variety of DIYs at the Project INspired party!

  4. Heather SettingforFour

    March 19, 2013 at 12:45 pm

    I’m featuring you today Laura! WOuld love for you to share more of your creativity at this weeks Project Inspired! http://www.settingforfour.com/2013/03/project-inspired-week-5-linky-party_18.html

    • Laura / The Shed blog by Pet Scribbles

      March 19, 2013 at 1:54 pm

      Thank you so much, Heather!! Dealing with my miserable chest cold that thinks it is somehow staying here for an extended vacation inside my body, means that I’ve been feeling a bit yucky. You totally just brightened up my day 1000%! 🙂

Trackbacks

  1. Rustic Twig Decor: 18 Easy DIYs says:
    November 27, 2014 at 1:32 am

    […] Spring Twigs and Spools Craft by Pet Scribbles […]

  2. Pet Scribbles featured on The Graphics Fairy! says:
    November 27, 2014 at 1:35 am

    […] my spool craft tutorial that I shared here last […]

  3. 15 Gorgeous Vintage Crafts - The Graphics Fairy says:
    April 21, 2015 at 7:10 am

    […] gorgeous birds on a tree come from the creative genius behind the blog, Pet Scribbles. The spools create the perfect tree […]

Primary Sidebar


Welcome to Garden Sanity by Pet Scribbles. I’m Laura, an artist and self-taught gardener. Gardening is therapeutic for me, peaceful and calming. I write articles and film videos centered around my own gardens, with plenty of plant suggestions and gardening tips. I’m glad you’re here and happy to share my garden inspiration with you!

As an Amazon Associate I earn from qualifying purchases.

As an Amazon Associate I earn from qualifying purchases.

© 2025 • PET SCRIBBLES LLC • PRIVACY POLICY