Let me set the scene…
One day last Spring, my husband I were looking at the backyard and considering what projects we needed to do, versus what projects we wanted to do. (We still have a long way to go in terms of getting this yard into shape.) We originally created a nice-sized vegetable bed area in our backyard, using raised cedar beds. We grew vegetables and herbs in these raised beds for a few Summers, but realized these beds were not getting as much sun as they needed.
 |
| Click here to see more images, and learn how we turned this into our firepit area! |
While surveying the land (not really, but it does sound good, doesn’t it?), my husband suggested moving these cedar beds to another part of the yard that gets full sun. I wondered where our dream pool would go thought it was a great idea. And most important of all, it would be an easy project.
How many of you have been there? An easy project. Won’t take any time at all. Hah! Not so fast!
My husband began taking the cedar beds apart, and guess what? Some of the wood was rotted all the way through from termites! Lovely, right?

 |
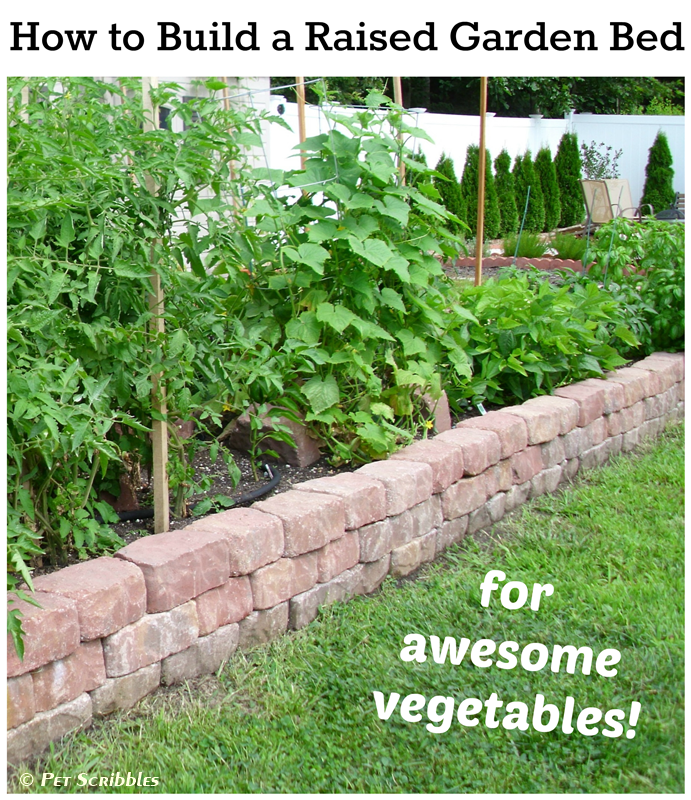
| This patio retaining wall faces the raised garden bed, and the stones of each match pretty well. |
We went to Lowe’s, where we picked out the stone to build the garden bed. No, this isn’t a sponsored post, I’m just sharing where we got our materials. Here’s what we chose:


In order to know how much stone to purchase, we measured out the area for the raised bed, and then my husband did the math. And I don’t have the exact math to share with you, but I can tell you that the bed is about 20 feet long and approximately 6 feet wide. And we wanted to use three layers of stone for the raised bed walls. Most major home improvement stores – Lowe’s included – have employees who can help you figure out exactly what you need.
The first step was leveling the ground where the stone walls would be. My husband used a tamper for this. Then it was time to get out the landscape fabric. This step is to prevent the raised garden bed’s soil from coming out through the tiny openings between the stones. Some people don’t mind this, and actually like the look of plants growing out of the stones. If you’re in that camp, you can skip this step!
You want to cut enough landscape fabric so that one end can be tucked underneath the bottom layer of stones, and the rest of it will be flush against the bottom and middle stone layers on the inside of the bed. You will tuck it underneath the top layer of stone, so it will remain hidden.

The bottom layer of your garden bed is the most critical. The stone is flat one one side and tumbled (cobbled) on the other. This means that as you build the wall, any errors you make in the bottom layer will just be magnified as you continue building up the wall. That’s why the bottom layer is so important.
My husband used a mallet and a level and worked stone by stone. The sides of each stone on the bottom layer were glued together as he worked his way around the bed. And yes, there were times when a previously leveled stone had to be worked on again. Sometimes the stones moved a bit when working on the adjacent stones butting up against them.

Once the first layer was down, and my husband did one more check to make sure the entire first layer was completely level, it was time to get out the glue!

Installing the middle layer is a bit easier. For this layer, choose the stones and rest them in place, so you have the entire second layer ready to be secured. It’s possible that you might have a space that won’t fit a full stone. You’ll need to use a masonry chisel to break the stone into a smaller piece to fit into that space. This stone is supposedly easy to break. (I say supposedly easy because I’m sure that if I were to attempt to break the stone, the word easy would not come to mind!)
Apply a good amount of glue onto the top of one of the stones on the bottom layer. Place a stone on top of it, hold it there, and add some glue onto the side where you’ll be placing the next stone. This glue is super strong. Once this glue dries, your stones aren’t going anywhere. Continue around the wall in this manner until the second layer is in place. We let it dry for a few days, before starting on the top layer.
Installing the top layer is almost done the same way as installing the middle layer. The landscape fabric needs to be tucked underneath this top layer, so that it will remain hidden. Pull up the fabric along the inside wall, place the edge on top of the middle layer, add the glue, and place the stone on top.

You don’t need to apply glue onto the sides of the top layer of stones, but if you do, make sure you keep the glue in the middle of the sides and toward the bottom, so that no glue shows. Let everything settle and dry for a few more days.

Next we needed to fill the bed with soil. We ordered two cubic yards of dirt – a mix of mushroom soil and top soil – from our local nursery. And yes, I embarrassed my husband because I just had to take pics of our soil being delivered!

Once the soil was delivered, it was simply a matter of shoveling it into a few wheelbarrows and – with the help of our neighbor – wheeling each load back to the garden bed and dumping it in. Return. Repeat. Then the soil was raked over and smoothed out, ready for some plants!

Here’s a shot after most of the vegetables had been planted:

The two yellow arrows (above) show the firepit area (on the left) and our Dapple Willow shrubs. Hopefully this provides a bit more perspective of where things are in our yard. Click on either link in the previous sentence to read my posts about each project.
We grew several different varieties of tomatoes, as well as eggplants, cucumbers, green peppers, chile peppers, string beans, and some herbs. To keep the bed watered, we used a soaker hose. And don’t forget the fertilizer. I shared my favorite fertilizer with you here.
Another picture, taken a month later, of our vegetables happily growing in full sun:

The tomato plants (far end, below) are almost as tall as the Leyland Cypress trees along the fence! And look at all of that savory basil just waiting to be picked in the foreground!

Here’s a view of the vegetable garden from our patio. The pots in front of the shed (above) contain three different varieties of hops, which quickly covered the wooden trellis structure we set up. (My husband brews his own beer.)

PS – Pardon our backyard lawn. We plan on getting rid of the grass and making gravel paths and more garden beds, so we aren’t at all concerned about maintaining the grass while we slowly transform the yard.
I love your raised garden bed. Thanks for sharing information. I hope to have a raised garden as nice as yours.
You’re welcome Kathy! We’re really happy we chose to use stones this time around!
Wow what a difference! Love that new bed! Would you consider linking this post with me? I would love more gardening post. On Wednesdays 🙂 Following you now on GFC.
http://www.familyhomeandlife.com/
Thanks so much Connie – I’d love to link up to your Wow Us Wednesday linkup! 🙂 Yes, this time of year I tend to do more gardening posts than crafts, probably because that’s just what I’m busy doing! 🙂
WOW! Love your raised garden beds. We built wood ones last year but might go to stone since ours are starting to fall apart due to the crazy weather in Florida! Look at all that glorious basil! I bet you made lots of pesto.
Yes, the basil was put to good use! I even like to just pick it off and smell it while I’m outside. Did I just share to much? LOL I love the look of wooden raised beds, but yes the weather can also wreak havoc on the wood. Let me know if you do a stone version! 🙂
Beautiful garden beds!!!
Thanks Aggie! (And I saw on your blog that you enjoyed your first vegetables of the season already – I can’t wait until we can too!)
wonderful garden beds…….Thank you for sharing with the Clever Chicks Blog Hop this week; I hope you’ll join us again!
Cheers,
Kathy Shea Mormino
The Chicken Chick
http://www.The-Chicken-Chick.com
Thanks as always, Kathy! 🙂
Love this version of raised garden bed! Looks fantastic — pinned!
A Pinch of Joy/
Thanks so much Charlene! (And thanks for the pin, too!)
glad I found your blog, such great ideas you have. I am in the process of planting and have enjoyed seeing your beds and getting ideas.
Betsy
Why thank you Betsy! I’m looking forward to seeing your gardens on your blog! 🙂
Thanks for posting and I’ve got this Pinned – a raised garden bed is on my “to-do” list, and I better get on it fast huh??
You’re welcome Heather, and I’m with you: I can’t believe it is already the end of May! I have so many outdoor projects yet to start, let alone complete! You’re not alone! 🙂
Laura, I like your and your husband’s style of paver garden bed a lot… took me many Google Image searches to finally find your “look”.
I’ll ask a couple of detailed questions hoping that others will benefit from the answers… I’m curious why you went for one big garden instead of a few smaller? We’ve been considering square foot gardening but it looks like you have tried something similar and have instead now decided to go bigger. What are the upsides of your wide, long, single garden? Does the big garden have any downsides, somehow? (i.e. do you have more/less weeds? Is the average of a 3′ reach for weeding, planting, etc. from each side of the garden any more inconvenient than your shorter reach with your old cedar garden? Thanks for the detailed instructions! Hoping to build something similar soon.
Hi Mike, thanks for all of your questions, and hopefully I can answer them! We decided on one big garden because the space allowed for it, and we felt we could fit more in the same amount of space we previously used, minus the walkways in between. For me it is a stretch weeding into the middle area, but my husband is 6’4″ so it’s not an issue. 🙂 The upside is using a soaker hose to water, you only need to use one hose, as opposed to setting up multiple hoses for multiple beds. The weeds DO seem endless this year, partly because of all the rain we’ve had!
Part of the reason we also chose to go bigger is simply the amount of vegetables we can grow is increased. Although I think you need to be smart about this. For example, last year we planted way too many tomato plants. This year, we planted a lot less, and instead chose other vegetables to include.
I was definitely a big fan of our cedar beds, and I think if the wood hadn’t been eaten by the termites, we would have kept the cedar planks but reconfigured them into the same sized bed we have now. I loved the look of the three smaller beds, just from a landscaping view. I think I’d suggest deciding on what you would like to plant first, and then spending some time seeing what likes to grow next to what, and then that may help you decide exactly how big, and how many, beds you’d like to have.
Let me know if you have any additional questions. I hope this helps!
Thanks for all the information. We are retiring from the Army and I am looking forward to settling down and having my own garden. My husband doesn’t like to garden so when I have him build my beds I need them to last the test of time since I imagine he won’t be too eager to replace any rotted wood. ha ha
You’re welcome Sherry! How exciting to be looking forward to retirement! Good idea to have your beds built with pavers or stone versus wood…especially if, as you said, your husband doesn’t want to have to do anything over again in the garden. 🙂