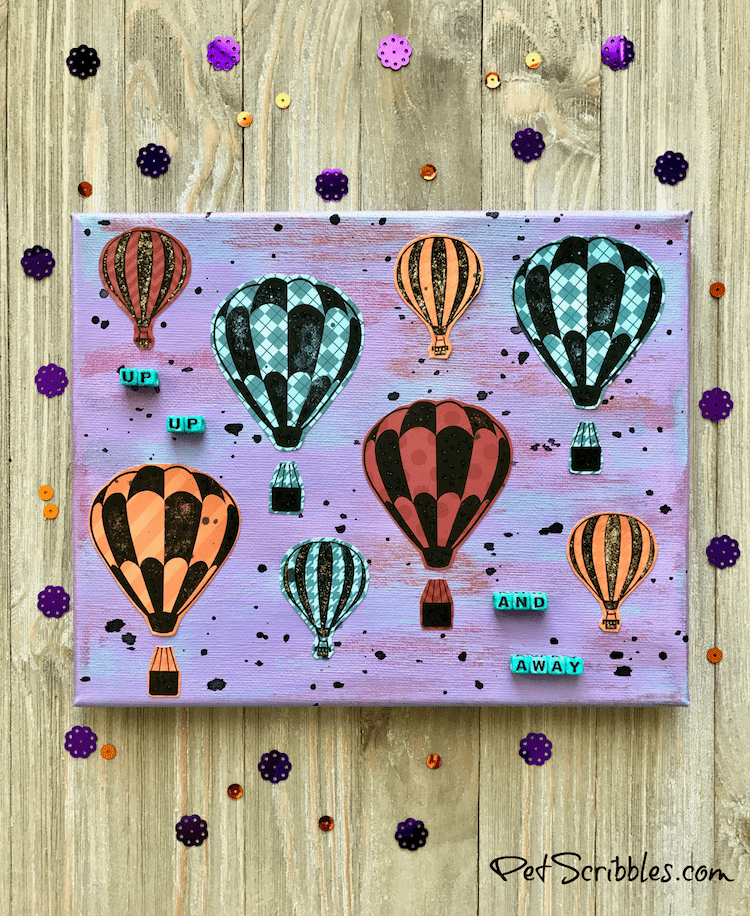
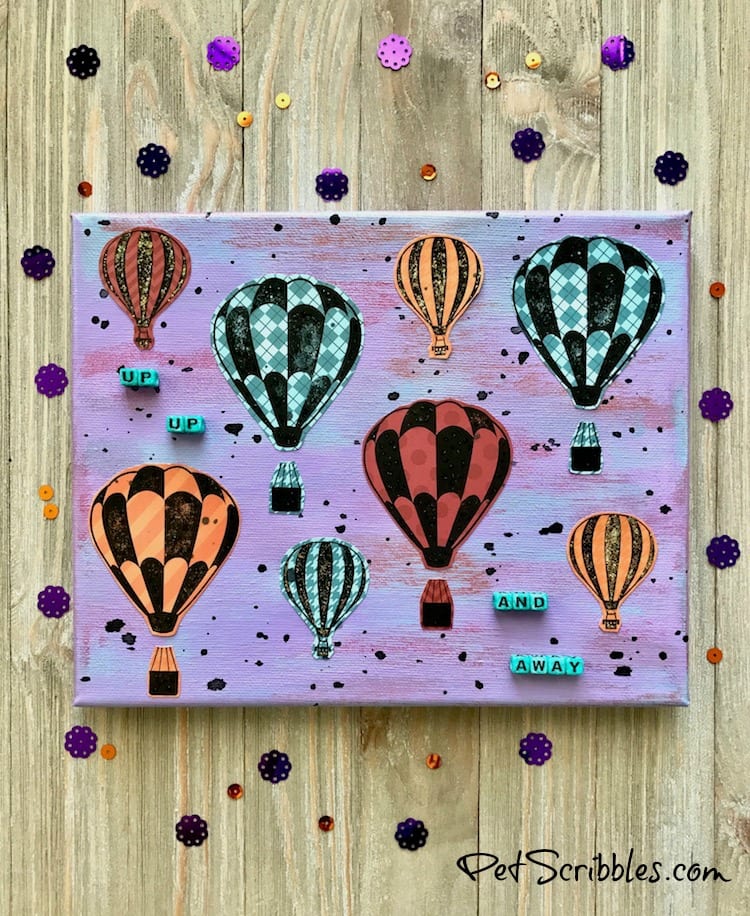
I’ll take you Up, Up and Away with my Hot Air Balloon Mixed Media Canvas tutorial! With hot air balloon stamps, pretty cardstock, and Xyron adhesive, it’s easy peasy to create!
All this week, Xyron is teaming up with Pink & Main for a fun blog hop!
Pink & Main is an incredible company, with products made in the USA. The owner and illustrator — Michelle Currie — was born with a type of Muscular Dystrophy, and although she’s used a wheelchair since she was a young girl — nothing stops Michelle’s creativity!
Here’s just two of the awesome products from Michelle’s company that I got to play with for today’s project!
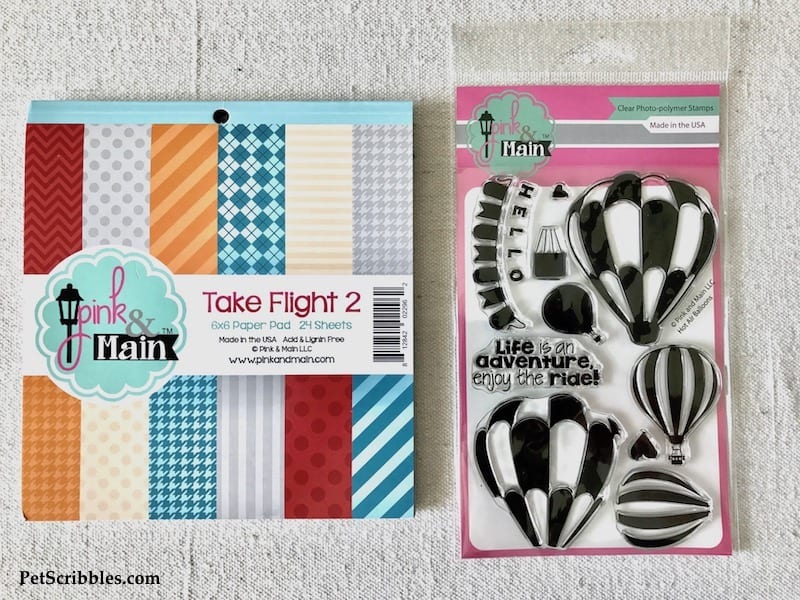
The paper pad is filled with quality cardstock, with designs on both sides.
The stamps are so easy to work with, and I fell in love with the vintage look of these hot air balloons!
FTC Disclaimer: I’ve received products/compensation as part of the Xyron Design Team. This Hot Air Balloon Mixed Media Canvas, however, is 100% my own project! Some of the links in this post are affiliate links. I explain more here.
Supplies:
- Xyron® Creative Station
- Xyron® Permanent Adhesive Refill, 9-inch
- Xyron® 1.5″ Sticker Maker
- Xyron® Permanent Adhesive Refill, 1.5-inch
- Pink & Main (TM) “Take Flight 2” Paper Pad, 6 x 6
- Pink & Main (TM) “Hot Air Balloons” Clear Photo-polymer Stamps
- Scissors
- Black Permanent Ink Pad
- Acrylic Stamping Blocks
- Blank artist canvas
- Craft paints (purple, light blue, medium pink, metallic bronze)
- Paintbrush
- Tim Holtz Stickles Glitter Glue (Diamond, Black Diamond)
- Tattered Angels Glimmer Mist (Almost Black)
- Plastic alphabet beads
- Spectrum Noir Alcohol Markers (teal blue color used)
- Liquid adhesive
- Wax paper
Hot Air Balloon Mixed Media Canvas
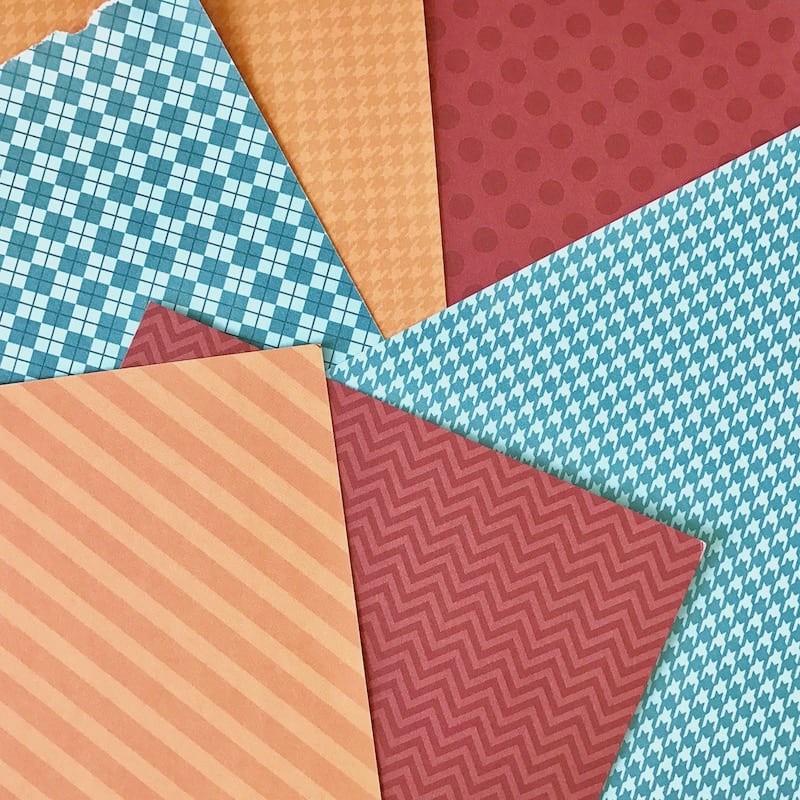
Step One: Choose your color palette from the Pink & Main paper cardstock in the Take Flight 2 paper pad.
Here’s what I chose:
Step Two: Stamp the hot air balloon images onto the cardstock. I used a permanent black ink stamp pad.
Step Three: Cut out your images, leaving a bit of the cardstock design around each balloon.
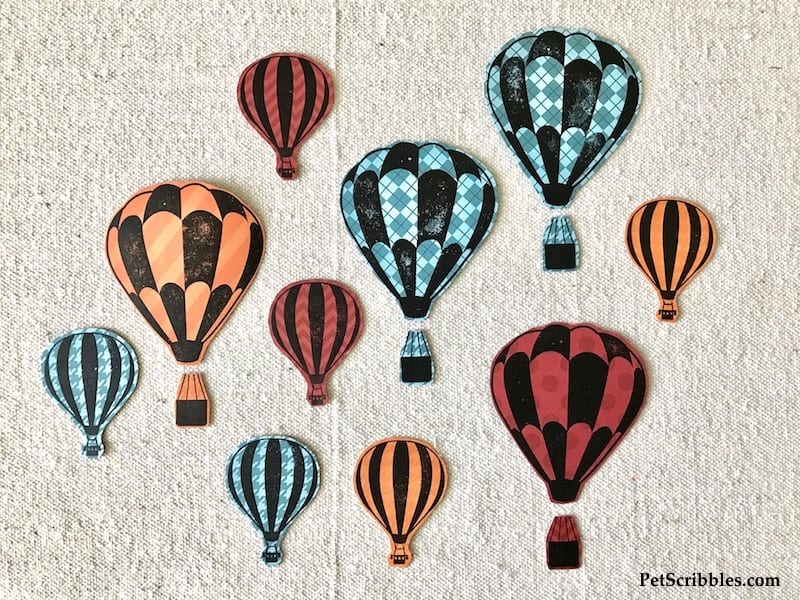
Note: Pink & Main makes a coordinating set of dies to go with these hot air balloon stamps, to make cutting these out easy peasy too. I didn’t have them, so I use scissors. Either way!
Step Four: Play with the placement of the stamped balloons on the blank canvas. Set aside your chosen images.
Helpful tip: Take a picture of the placement with your smart phone, to remember where everything goes.

Step Five: Paint the canvas.
I started with one coat of purple craft paint. (below left)
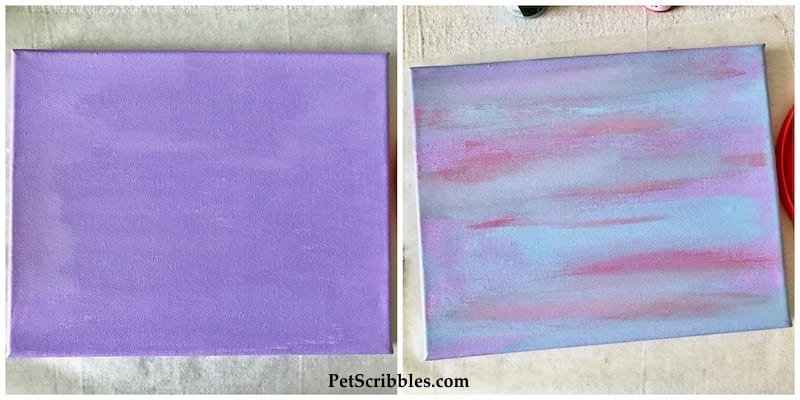
Not waiting until the purple paint was dry, I began brushing (horizontally) additional colors onto the canvas. (above right)
Sometimes in small sections, sometimes larger.
To add depth, I used a medium pink and a metallic bronze. (below left)
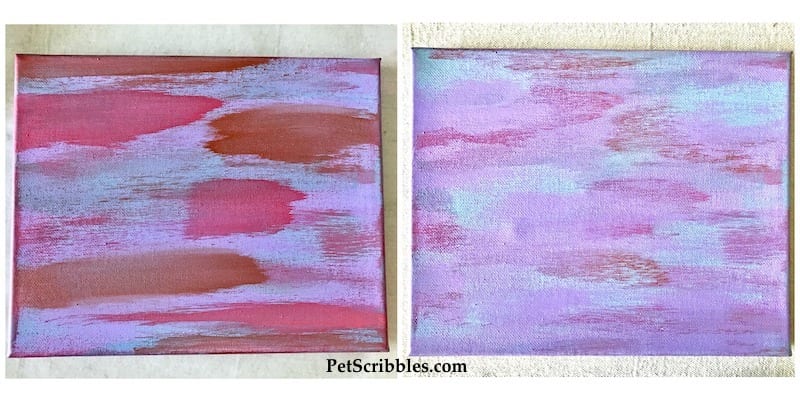
There’s no wrong way to do this! You stop when you like how it looks. My final canvas (before drying) is above, right. Let dry thoroughly when finished.
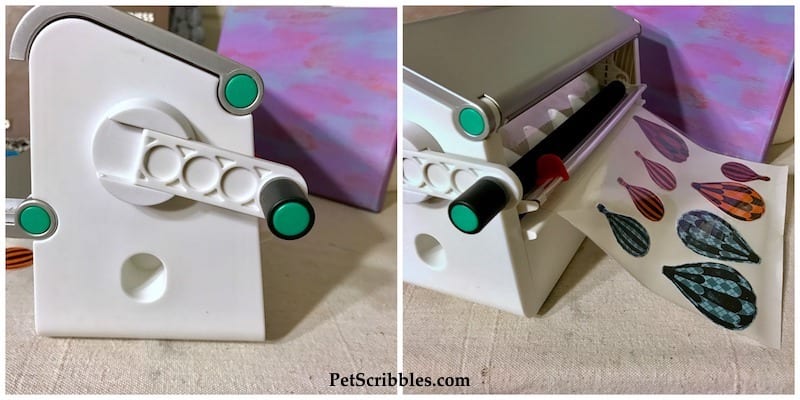
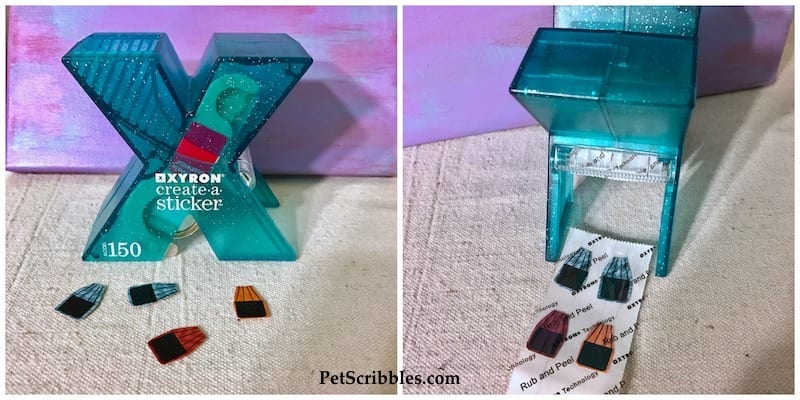
Step Six: Run the stamped images through the Xyron Creative Station, using permanent adhesive listed above in the supplies list.

For those not familiar with this most awesome of machines — yes I’m on the Xyron Design Team so I’m biased!! — here’s how it works. First, place your images into the Creative Station as seen above.
Next, turn the handle (below left) to make the images go through the machine. Like magic, out come your images, now in the form of stickers! (below right)
Step Seven: Use the Xyron Sticker Maker for the smallest images.
Step Eight: Referring to the smart phone picture, adhere the balloons to the canvas.
To help press them to the painted canvas, keep one hand underneath the canvas.
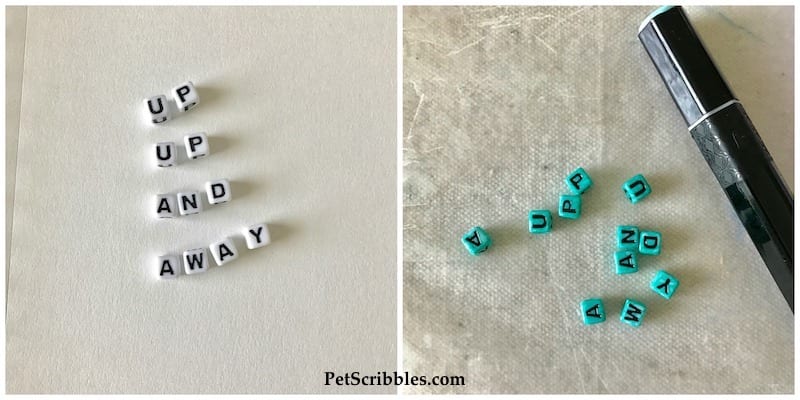
Step Nine: Use a Spectrum Noir marker to “paint” some plastic alphabet beads. Let dry.
Step Ten: Once dry, attach the letters to the canvas using liquid adhesive.
Step Eleven: Add Stickles glitter glue to the balloons and baskets.
I used the Diamond-colored Stickles on the small hot air balloons. For the large balloon, I just dabbed a bit of Black Diamond-colored Stickles here and there on each one.
Step Twelve: Add black flecks of Tattered Angels Glimmer Mist all over the canvas.
This is easy to do, but make sure you have some wax paper underneath, as there will be some splatter.
Practice first on scrap paper and you’ll quickly get the hang of it.
Use the “stem” attached to the cap in the bottle, and gently tap it with your finger over the canvas in random areas.
Do this very lightly at first, as you can always go back and add more!
All finished!
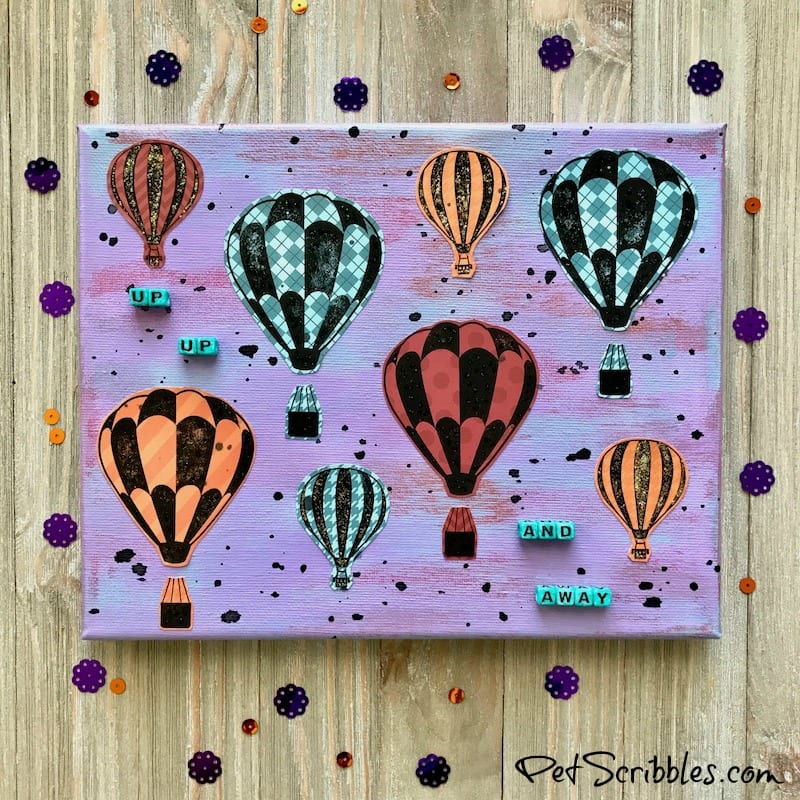
This would be so cute in a nursery!
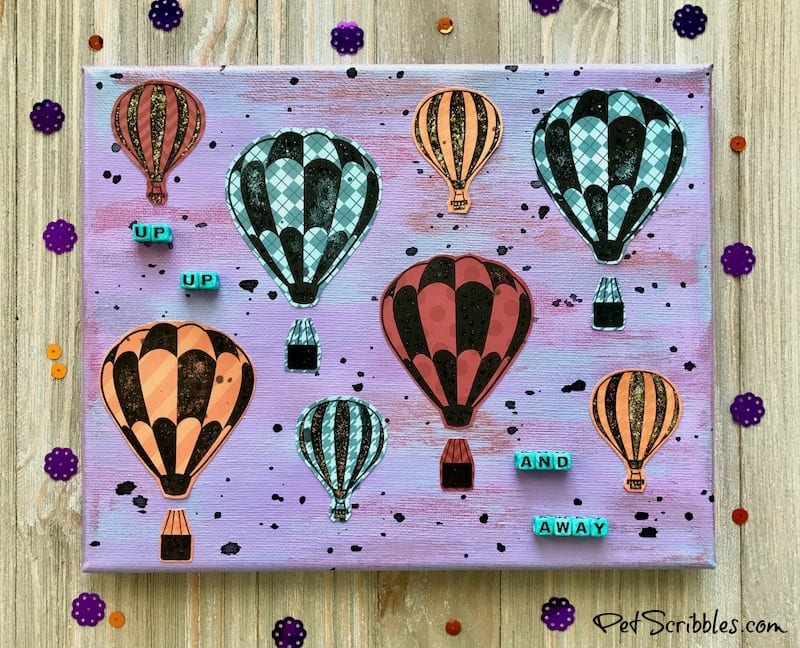
I love how it turned out!
Giveaway Time!
Both Xyron and Pink & Main are holding giveaways this week during our Blog Hop!
- Stop over to the Pink & Main blog and leave a comment on each blog hop post all week long, to be entered to win a $25 Pink & Main gift certificate plus a Xyron Mega Runner.
- Visit our Xyron Facebook Page and leave a comment on any — or all — of our Pink & Main/Xyron blog hop posts shared on our page throughout this week to win the same prize package!
Happy crafting!
~Laura
Such fun!
Great project. I don’t use my Xyron’s enough. I must do that!
This piece is fantastic.
I went on a balloon ride when on safari in Africa in 2012.
There were a lot of balloons up that day – much
like your piece. All were elaborately decorated.
This really brings that time to mind.
thanks for sharin