
One of my creative blogger friends, Erin of My Very Educated Mother, has been hosting a No Ugly Ornament Series on her blog over the past several years.
Each November, several bloggers get together and share their ornament ideas, upgrades, DIYs – all easy, all inexpensive – so that you, dear readers, will never have to endure an ugly ornament in your own homes! Consider it a public service!
Today, I’m going to show you how easy it is to transform an unused and unloved ornament into something you’ll treasure for years to come!
It all started when we received this keepsake ornament as a gift. I guess we received in 2008.

No, we don’t collect them, and no, 2008 wasn’t a significant year. It came in a pretty red box, and the ornament itself was fairly well done, except for the numbers which aren’t 100% straight – but of course that’s what you get with made in China, folks.
We never hung this on our tree or displayed it anywhere. It just wasn’t us. And so it sat in one of the way-too-many storage bins filled with Christmas decorations. Each year I would see it, and each year it just stayed in the bin. It wasn’t ugly. But it was unused and unloved.
Ready to see the transformation take place? It all started with one of my favorite products: Martha Stewart Liquid Gilding in Gold. I used this on paper maché ornaments I made last year . . .
 |
| Easy DIY Gilded Ornaments using liquid gilding and glitter paint! |
. . . and fell in love with what a difference just a coat or two of this makes on whatever surface you’re covering.
Step One: Cover the bell in one coat of liquid gilding.

It dries fairly quickly, and already looked much better! And you could leave your ornament just like this, add a decorative ribbon and be finished. But of course I wasn’t done yet!

Step Two: Age the bell using metallic glazes.
Next I grabbed another product line that has fast become my most favorite product line ever: DecoArt Dazzling Metallics. On smooth surfaces, metallic glazes can add depth to your color while aging your surface beautifully. And these metallic glazes are perfect for textured surfaces, as they enhance any nooks and crannies, giving an old-world look.
Here’s a comparison before-and-after for you. On the left is the liquid gilding. On the right, a brown metallic glaze was added.

These are glazes that take longer to dry, so you can do more with them. You can use a brush, use a cloth, use whatever you want to apply them to your surface.
Renaissance Brown metallic glaze
I used a cotton swab to apply the glaze, waited about 30 seconds, and then gently wiped it off with a paper towel.

As I started to build up color, I kept applying, waiting (from 30 seconds up to a few minutes) and then wiping the glaze off in different spots and sections.
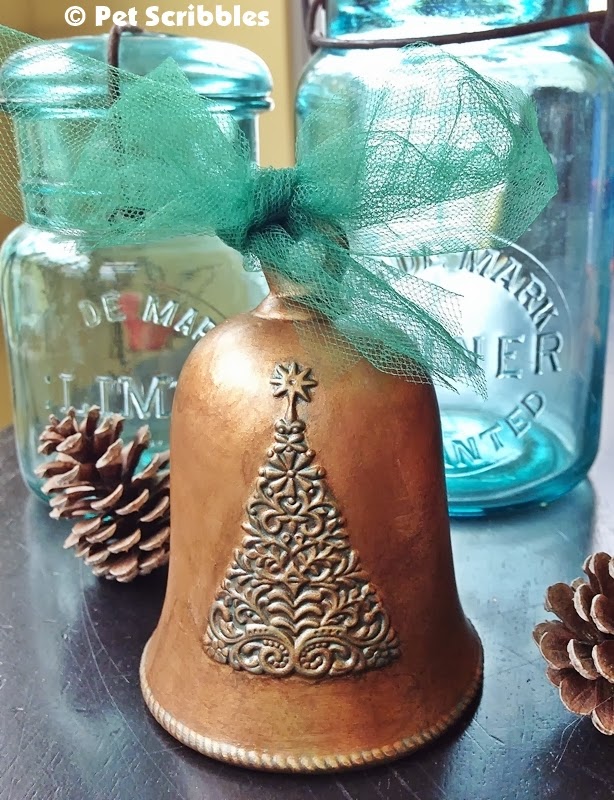
I love how the bell looked once I was finished this step. It took on a heavy, brass look. An old-world look. But I still wasn’t quite finished!
Olde World Patina metallic glaze
Using a new cotton swab, I carefully applied the Olde World glaze onto the Christmas tree and around the base along the ridged area. As these were both very small areas to work with, I used the other end of the cotton swab to wipe off the glaze in certain spots, leaving other areas (especially the nooks and crannies) filled with more of the glaze.
I left the bell to dry overnight.
Almost done!
Step Three: Add some matching green tulle as the ornament hanger.
And now we have an ornament that is much more “us” as it matches our decor as well as many of our most-loved Christmas decorations too.
I say “we” because my husband loved how this ornament turned out! And that’s always a win-win for us gals, am I right?


Conclusion? Get those ornaments out that you never really liked, and see if you can take them from ugly to lovely!
Make sure you visit Erin’s blog (My Very Educated Mother) to see what my blogger friends have crafted for the No Ugly Ornament Series as well. All this week Erin is sharing our ideas and tips, and lots of her own creativity too!
~Laura
I was anxiously awaiting the reveal and am not disappointed! Awesome makeover.
Thanks Carol! It was so easy to do and so gratifying to see the results!
This is such an awesome idea, I want to hit up the thrift stores in search of bells now! Thank you for being a part of the series! 🙂
That’s what I said too Erin, when I finished this bell: I want more of them! 🙂 Excellent series and thank YOU for organizing it!
This is such a great idea- we have ornaments like this with random dates and this is a great fix! I’m picking up liquid gilding on my next craft shop run! 🙂
Ooooh, I’m so glad Christina! Let me know how yours turn out! You’ll love the liquid gilding!
So much nicer now Laura and it won’t need to stay in the box this year!
Thanks Kerryanne! My mother expressed “casual” interest in it…but I think I want to keep it! 🙂
Wow it looks great! I love your technique!
Why thank you, Malia! 🙂 You are so sweet to me!
I see ornaments frequently in thrift shops that are pretty but out of date. Now I know that I need to buy them and give them a makeover. Thanks for the great tips!
You’re welcome Paula! I think I’m going to be doing the same thing. (In fact, I already picked a few of our other ornaments out that just might need a makeover. Shhh….)
So very pretty! I’ve pinned this one…thank-you for sharing!
You’re so welcome Lisa… and thank YOU! 🙂
Laura, I love how you redid this ornament and thanks for introducing me to the no ugly ornament series – how awesome!!! Thanks so much for sharing at the All Thing Christmas party! Pinning and hope you have a wonderful week!
So glad you like the ornament, Cindy! And glad you enjoyed the No Ugly Ornament series too! Thanks so much for sharing this project!
I’m a little late finding this for this season but at least I’m in good time for 2014!! I made my way here via The Sewing Loft who also participated in No Ugly Ornaments.
People keep giving me these dated ornaments or ones with the name of an organization or company on them and I never put them on the tree. I also haven’t gotten rid of them because some are pretty shapes. This is perfect since it not only obliterates the unwanted writing, it also will tie them all together as a set. And I have time to get this done for Christmas!!
Glad you found me via Heather’s blog, The Sewing Loft! What a fabulous idea to take a bunch of dated ornaments like you describe and making a set out of them! I’m going to be on the hunt now for discarded ornaments when I’m out thrifting… never too early to get ready for next Christmas! Thanks for the idea, Lin!