• Skip to primary navigation
  • Skip to main content
  • Skip to primary sidebar
  • Home
  • Gardening Index
  • Videos
  • Subscribe
  • Navigation Menu: Social Icons

    • Facebook
    • Instagram
    • Pinterest
    • RSS
    • Twitter
    • YouTube
Garden Sanity by Pet Scribbles

60th Anniversary Wedding Centerpiece DIY

This post and photos may contain Amazon or other affiliate links. If you purchase something through any link, I may receive a small commission at no extra charge to you. Any supplies used may be given to me free of charge, however, all projects and opinions are my own.


August 10, 2013 By Laura

Pin
Share
Post
1Share

60thAnniversaryCenterpiece.png

My parents celebrated their 60th wedding anniversary last month! What’s more? They dated for 7 years before they got married, so they’ve been together for 67 years, through three children and countless episodes that life brings to any marriage and family. Through everything and every year they have remained happily married! How cool is that? And how lucky am I? Very!

Trying to find decorations to celebrate a 60th wedding anniversary is not an easy task. First off, there’s not much to choose from. And secondly? Some of what I saw either was a bit tacky or was a bit “old” looking. Yes my parents are 82, but they are definitely 82 years young, not old! They don’t need something stuffy and formal!

So what to do? Make my own!

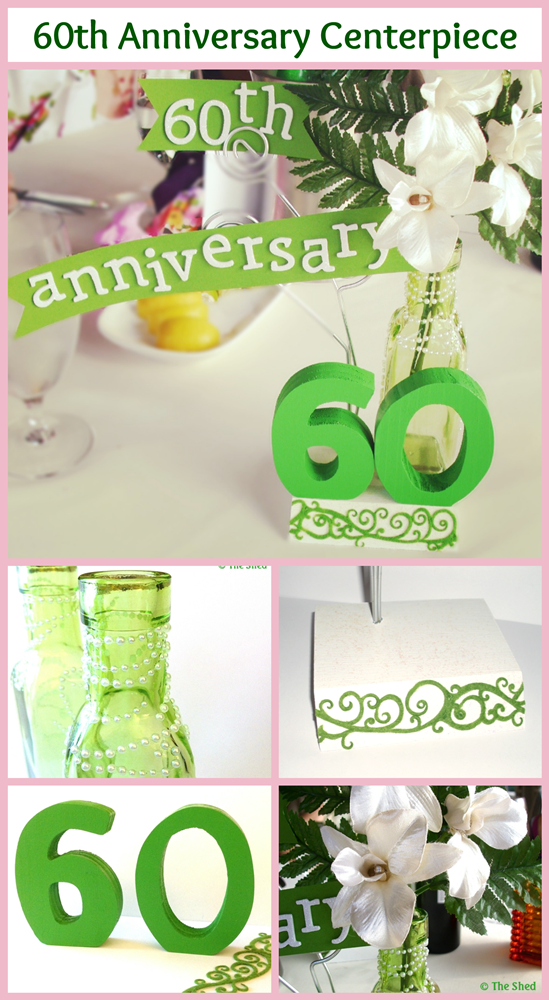
60th Anniversary Centerpiece!

I had a good idea ahead of time what I wanted to make, and was able to find the components at a few different craft stores. I actually made two identical centerpieces so that they could be back-to-back. This way everyone could enjoy them no matter where they were seated around the large table.

The base of the centerpiece was a very basic wooden photo stand, as you see below. I taped off the bottoms of the metal photo holder stems to make it easier to paint the wooden bases.

wooden photo holder served as the base for the centerpiece

I painted the base with two coats of white paint, and then topped that with a coat of white glitter paint to give it some subtle sparkle.

wooden base painted in white paint with a coating over white glitter paint
I wanted a large “60” to be front and center of this centerpiece, and these unfinished numbers were perfect. I painted them with two coats of a Summery green paint. I used DecoArt’s Multi-Surface Satin paints on the bases and numbers. These paints don’t require any primer or sealer and cover extremely well.
wooden numbers were painted in a Summery green shade
I found some adhesive flocking in the same green shade at the craft store, which I knew would look pretty on the front of the wooden base.
Love how these numbers became the focal point of the centerpiece!
And here’s the wooden base all finished with the green flocking. I glued a piece of white felt to the bottom too.
60th anniversary centerpiece base, all painted and with flocking detail

Next it was time to decorate the small green bottles. My idea was that one bottle would be glued to each centerpiece base, next to the photo holders.

small green glass bottles from the craft store, perfect as bud vases

I found these tiny adhesive pearl stickers to decorate the bottles.

adhesive-backed tiny pearls are a great way to embellish small glass bottles

I decorated the tops of the bottles, since they would be seen. I left the lower areas and backs unadorned, since they wouldn’t be visible.

small green glass bottles embellished with tiny white pearls

The bottles and the wooden numbers were attached to each wooden base with E6000 adhesive.

60th anniversary centerpiece - a modern and fresh design
Ever used Thickers from American Crafts? They are adhesive-backed foam letter and number stickers that come in an array of colors and finishes. I adore them! I found some white glitter Thickers that matched perfectly with the white glitter base of the centerpiece.
White Glitter Thickers from American Crafts matched perfectly!

I used solid green scrapbook paper – which I cut to resemble little banners – as the background for the 60th anniversary that I spelled out with the Thickers.

60th anniversary banners easily attached to the photo holders
Here’s a closeup shot of the various textures together: wood, glass, paper, beads, fabric, flocking and metal.
60th Anniversary Centerpiece - closeup shot of the various textures together: wood, glass, paper, beads, flocking and metal.
And the finishing touch? Silk fabric flower stems in a pretty antique white color, backed with some ferns.
white silk fabric flowers used in the 60th anniversary centerpiece

We all got together in Philly last weekend to celebrate their milestone. My husband and I got to the restaurant early, so that we could put these centerpieces on the table before everyone arrived.

DIY - 60th Wedding Anniversary centerpiece

My parents loved them! We took several pictures during the evening, and my parents will add one of the family group shots to the photo holders as a sweet keepsake from that special night.

60th Anniversary decoration - DIY

I loved that all the waiters and restaurant staff kept marveling that my parents must have gotten married when they were kids. Why? Because even though my parents are both 82 they look much, much younger! I’d share a picture, but they are very private people and I promised that I wouldn’t. But trust me: they are doing great and I hope and pray they are around for a long time to come.

60th Anniversary - make a keepsake centerpiece!

Our dinner celebration was outdoors on the water, and I loved the way the light changed as the sun was setting . . .

60th Anniversary lettering on centerpiece
Up close shot of the white silk fabric flowers - 60th anniversary centerpiece

Making something for my parents to keep was truly a labor of love. Truly.

~Laura

Pin
Share
Post
1Share

Filed Under: Crafts & DIY Tagged With: 60th wedding anniversary, American Crafts, DecoArt, DIY, DIY centerpiece, handmade, handmade gift ideas

Previous Post: « Chenille Pipe Cleaner Doll – a basic tutorial
Next Post: Creative DIY Lampshades: 29 unique projects »

Reader Interactions

Comments

  1. Mariely Velez

    August 10, 2013 at 4:34 pm

    Love it!! Congrats to your parents ๐Ÿ™‚ I’m planning my wedding for next year and I’m trying to make some things by myself. This is perfect for me ๐Ÿ™‚ Thanks so much for sharing!

    • Laura / The Shed by Pet Scribbles

      August 10, 2013 at 7:48 pm

      You’re welcome Mariely! Glad you like it! Best of luck planning your wedding and making some of your own wedding items too. You’re smart to plan well in advance! ๐Ÿ™‚

  2. malia

    August 11, 2013 at 3:49 am

    Happy Anniversary, Laura’s Mom + Dad! Great centerpiece Laura… very happy and love the color!

    • Laura / The Shed by Pet Scribbles

      August 12, 2013 at 1:51 pm

      Thanks – on their behalf – Malia! I’ll pass along your well wishes! Green is my Mom’s favorite color, so that was part of the color choice for me! (And the exact shade was in the print on her outfit that night – too perfect!)

  3. Mary Beth

    August 17, 2013 at 2:01 am

    Wow ~ how wonderful for your parents and you! I love the centerpiece ~ such a cheery addition to such a fabulous occasion.

    Thanks for sharing at Project Inspire{d} ~ pinning.

    Big hugs,
    Mary Beth

    • Laura / The Shed by Pet Scribbles

      August 17, 2013 at 2:41 pm

      Oh Mary Beth, it was such a sweet time to celebrate with my parents! Thanks so much for hosting the Project Inspire{d} party each week!

Primary Sidebar


Welcome to Garden Sanity by Pet Scribbles. Iโ€™m Laura, an artist and self-taught gardener. Gardening is therapeutic for me, peaceful and calming. I write articles and film videos centered around my own gardens, with plenty of plant suggestions and gardening tips. Iโ€™m glad youโ€™re here and happy to share my garden inspiration with you!

As an Amazon Associate I earn from qualifying purchases.

As an Amazon Associate I earn from qualifying purchases.

© 2025 โ€ข PET SCRIBBLES LLC โ€ข PRIVACY POLICY