If you follow my blog, you’ll remember that I recently was asked to try out the Tulip Tie Dye Kits from ILoveToCreate.
First I did a glue resist technique and created a pretty pinkish-lilac-colored top, which you can learn how to do (and see fun pics!) here.
I also created a sort-of patriotic off-center stripe Summer top, which you can see (and find the tutorial for) here.
The set-up, products and supplies needed can also be found in either of those two posts, so please click on them for more information.
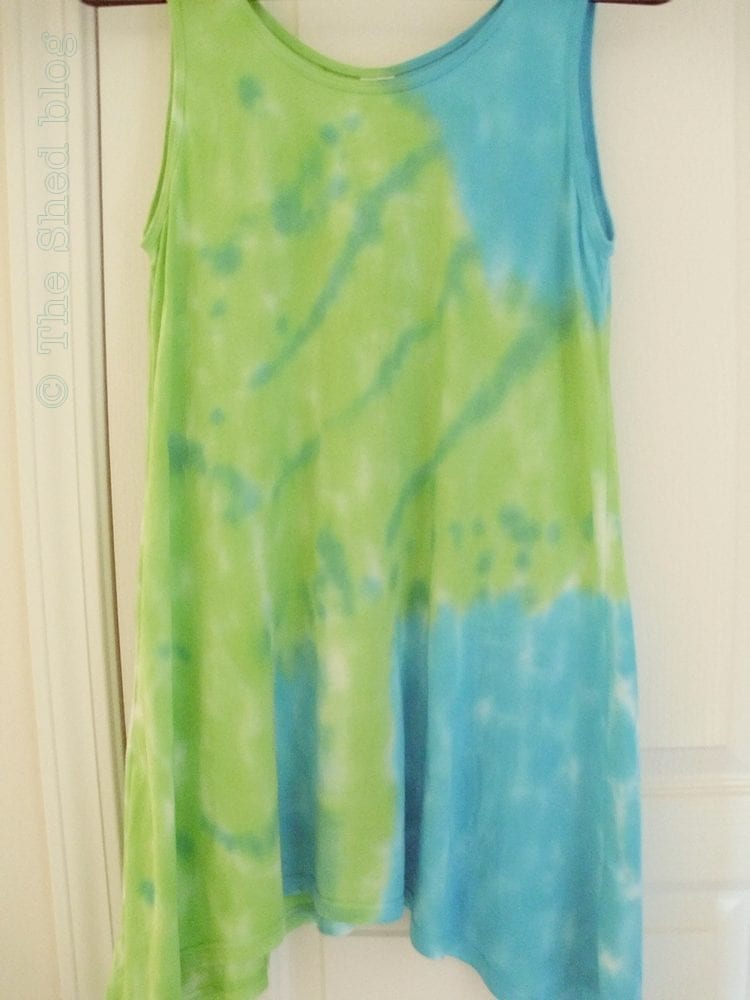
Lime Green and Teal Summer Tank
For this tank top, I decided to apply the dye directly onto the garment without using any rubber bands, resists, or anything else. Just an easy application of the dye straight from the bottles. Tip: Before embarking on this project, spend some time thinking about any type of design or pattern you would like to make. I played around with various ideas of which colors I wanted where on the tank. I decided to have the tank be mostly green, with a bit of teal up by one shoulder, down at one of the lowest side seams, and then splotched over the green with 2 or 3 diagonal lines across the front.
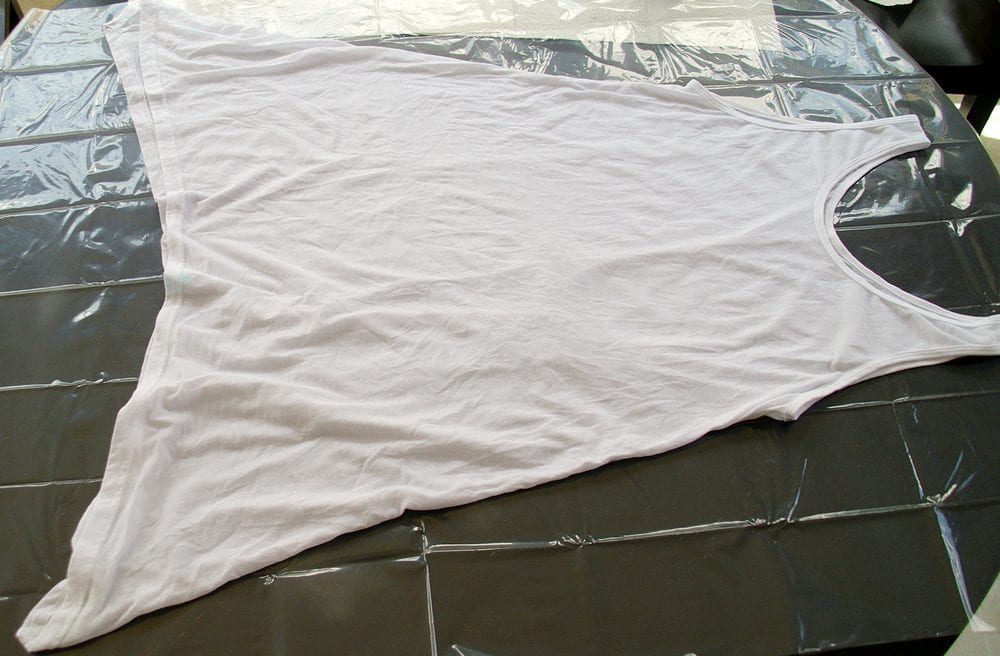
Start with a damp garment, spread it out on your protective covering, smooth it out as much as possible, but don’t worry about getting every last bit of the fabric to lay completely flat.
STEP TWO
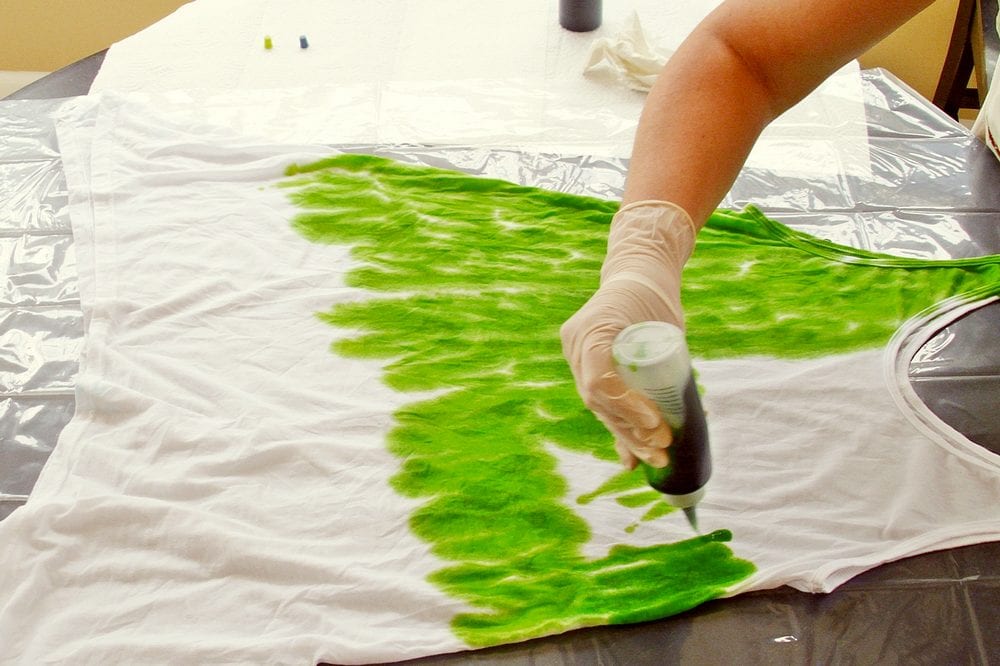
Put on your protective gloves. Mix up your dye following the manufacturer’s directions. Start with your first color, and simply squeeze the dye from the bottle onto your garment.
STEP THREE
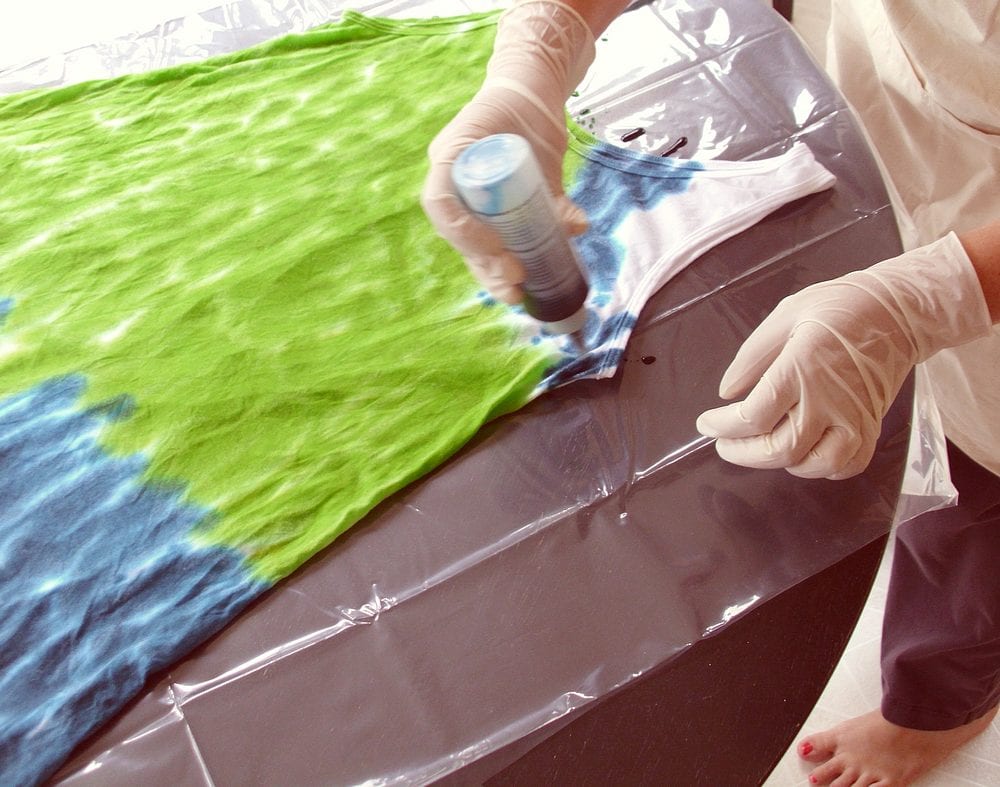
Take your second color, and apply the dye to your fabric in the same manner as the first color. Continue until you are satisfied with the colors and design. The colors might seem to be bold and dark, but the final colors come out lighter as you’ll see in the final images below. (I think this was my favorite color combination out of the three tie dyed Summer tanks that I made!)
STEP FOUR
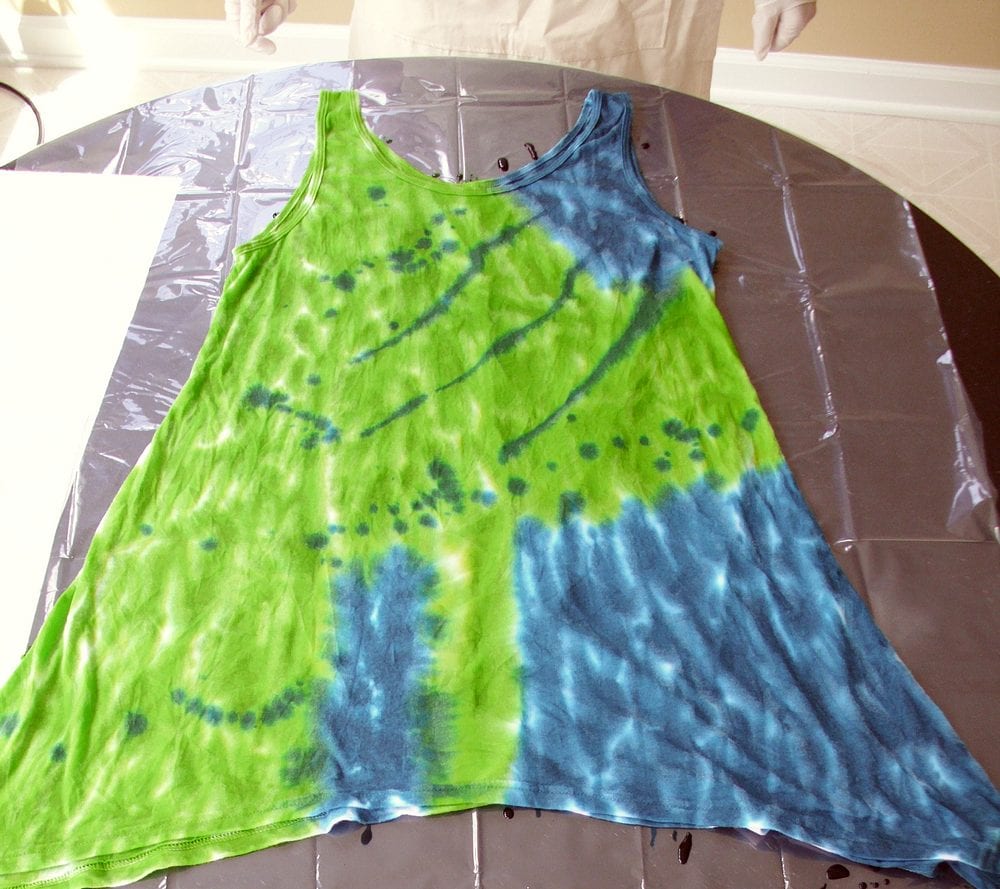
Next, add some additional free-form designs, still using the squeeze bottle. I made some dots, drew some diagonal lines, and then flicked the bottle for some random color splotches. (Make sure not to flick too much, or you’ll have dye on surfaces you didn’t intend to dye!)
STEP FIVE
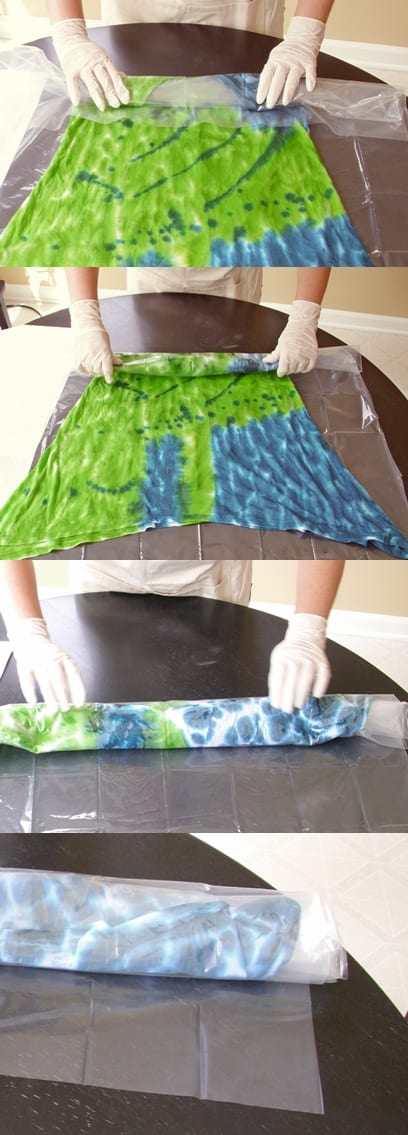
Now it is time to let your fabric sit for awhile to soak in all of the dye. To preserve the colors and design, I simply rolled the fabric up in the protective plastic covering, starting at the top of the garment. Set your project aside and let it dry for about 8 hours.
STEP SIX
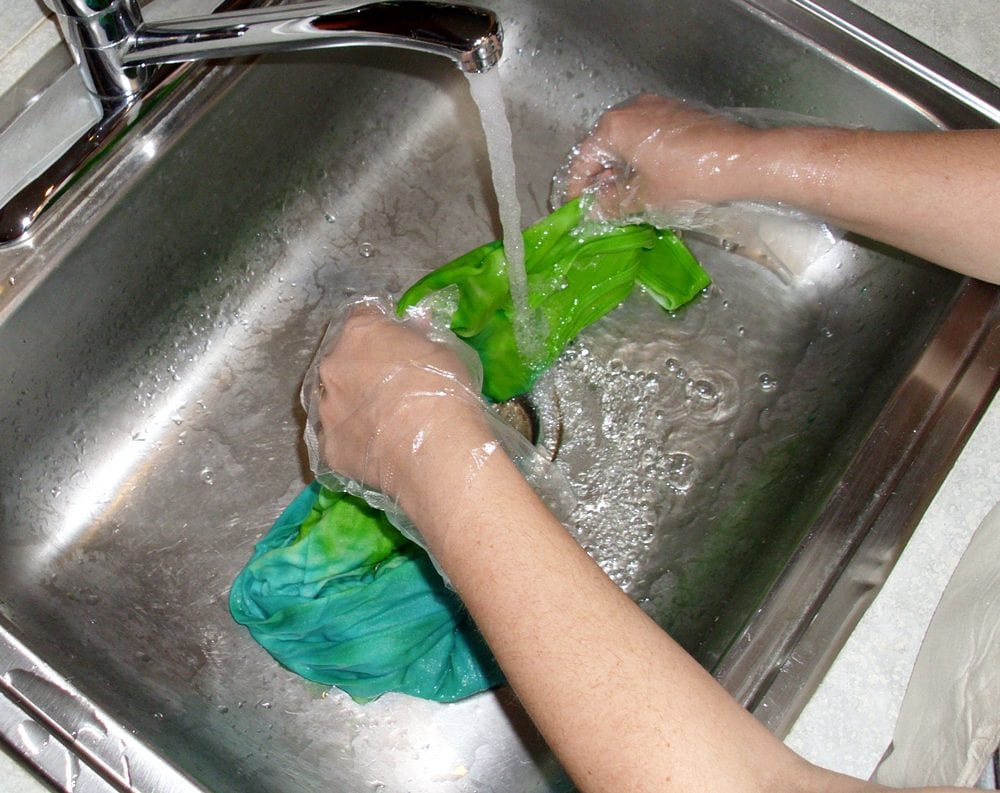
Carefully unroll your garment from the plastic wrap and give the fabric a good rinse in cold water. Rinse until the water runs clear.
STEP SEVEN
Set your machine to a large load setting, and use the hottest water appropriate for your garment with just a bit of laundry detergent. I actually used cold water, because that’s just what I usually do with my Summer tops, and this top came out just fine. Pop the top into the dryer, again on whatever setting is appropriate, or just hang it up to dry.
Voilá!
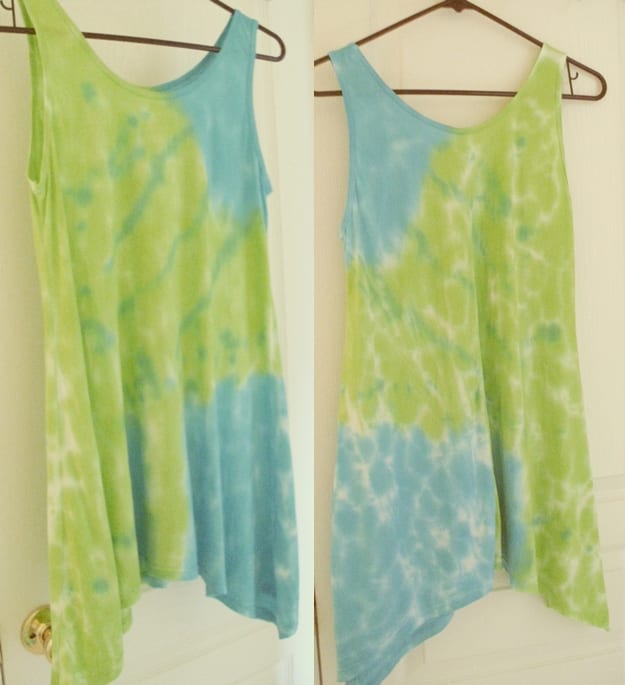 |
| The front of the tank, left……………..and the back, on the right. |
And there you have it: another easy peasy Summer tank top!
~Laura
Disclosure: I wrote a previous tie dye post as part of a paid campaign, but this post is just me playing with the Tulip Tie Dye Kits a bit more as it was just that much fun!
Tie dye is so fun and perfect for summer. And I love that you don’t have to do the old messy rubberband method for this one.
Yes Stacie – the longest part of this entire project is the time you let the garment sit inside the plastic! 🙂
I love this- I have been wanting to make a tie dye shirt with my kiddos this summer but keep putting it off– this looks like I could actually make it! This really is cool.
It truly is easy Janette! And there’s really no way to “mess it up” because that’s part of the fun: not knowing exactly how the design will turn out! Let me know if you try this, I’d love to share pics on here!
This project is really wonderful, I love it. Thank you for visiting to my blog and leaving such a nice comment, I am glad you liked my project, have a wonderful day.
Thanks Erika! And you’re welcome, too! 🙂
Laura
Came over from your comment on my post. How serendipitous! My niece is coming to spend a long weekend and wants to do altered clothing art. This will be a perfect jumping off point. Thanks for visiting and I will be back to check your other posts!
Distressed Donna Down Home
P.S. Did you really do this inside the house!?!
Yes Donna, this project – as well as the two other ones linked to in the post – all done inside on our kitchen table. 🙂 I used a big all-purpose bucket (seen in one of the previous tie dye projects) to “carry” the garments from the kitchen sink to the washing machine, just to avoid drips. And I had lots of paper towels handy for any splotches. If doing tie dye with kids, I might otherwise do it outdoors. Let me know if you end up tie dying something!
Love this!! I have never thought to work with tie dye this way! Thanks for showing us all the steps and before, during and after photos! Sharing this on Facebook! Heather 😀
Thanks Heather! It really is easy and fun to see the difference (or not LOL) between what you envisioned versus what it ends up being! 🙂
Am your newest follower via Google Friend Connect too 🙂 Heather
Thanks – likewise me to your blog too! 🙂
I’d like to know where you found that floatly style tank to. Most tanks I see are skinny.
Hi Kerry, Thanks for asking! I ordered this tank, as well as the two other styles (in my previous tie dye posts) from Dharma Trading Co. Here’s a link for you: http://www.dharmatrading.com/topnav/clothing/ They have an amazing selection of “dyeables” and some of the garments are made in the USA too!